I’m sharing a simple, budget-friendly DIY board and batten tutorial that will instantly transform your walls. Keep reading for the step-by-step guide!
So excited to share today’s post with you. A little while back I shared my design plans for our home office. One of the main design elements for this room is adding board and batten to the walls. It is an easy budget budget-friendly project that adds a ton of character and visual interest.
There are a few different ways to do DIY board and batten. I personally love a skinny board and batten look. I also love the idea of doing two colors. So we are doing a warm white on the top and a warm grey on the bottom. I am sharing every step of the process below making it really easy for you to achieve in your own home.
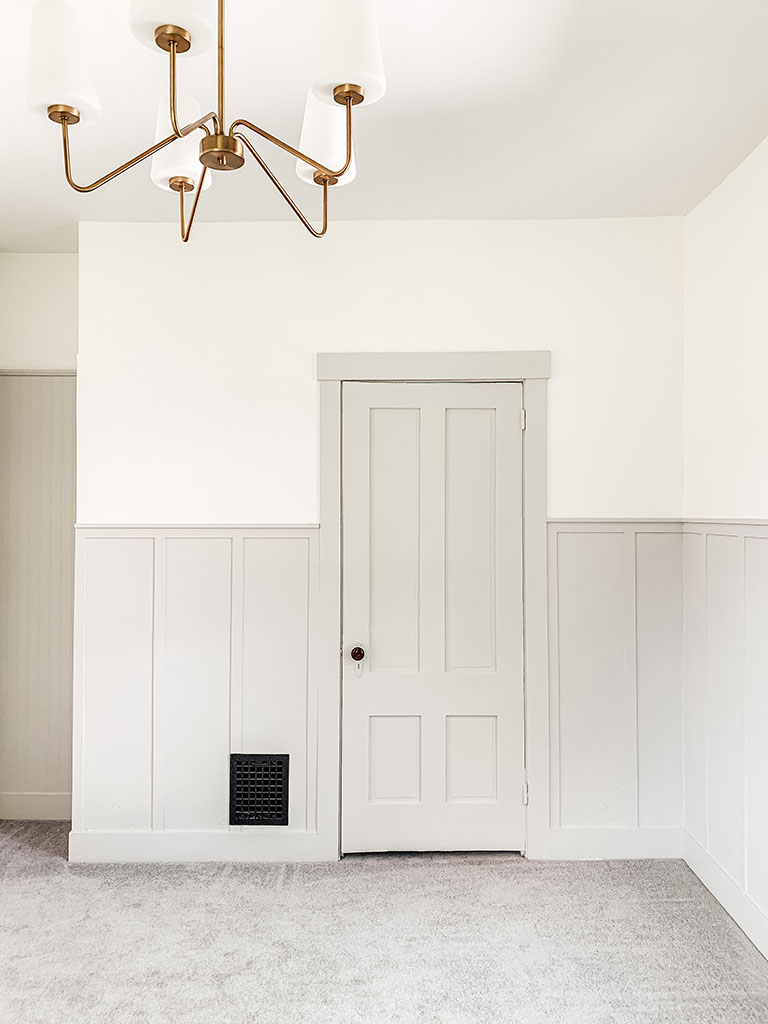
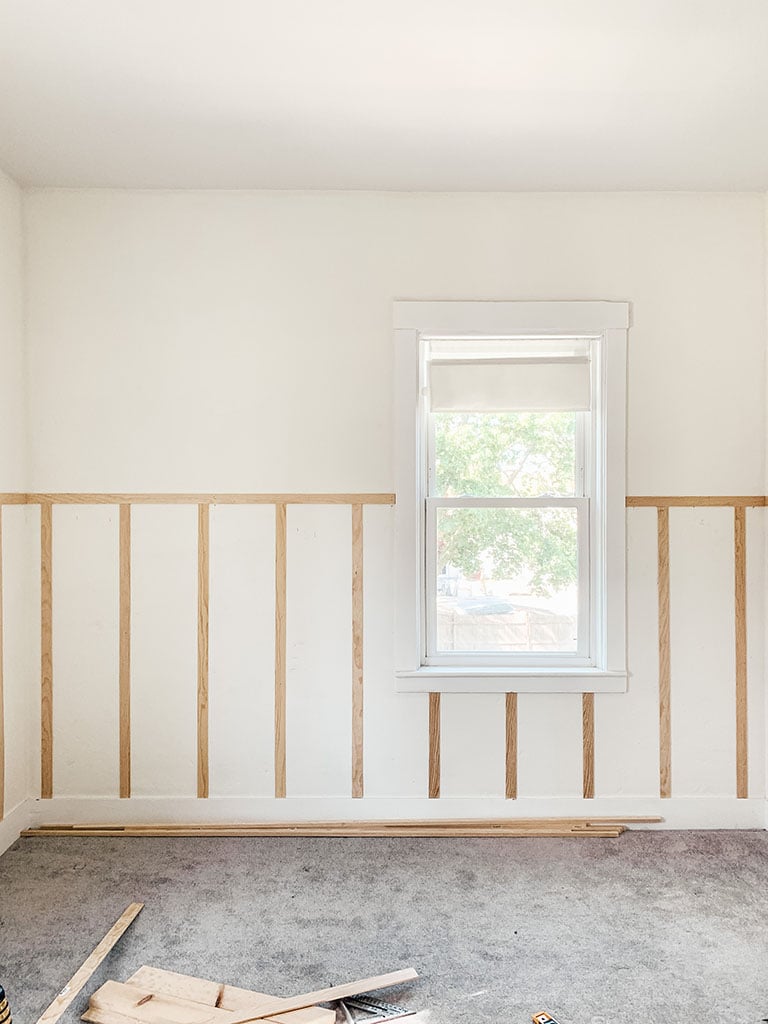
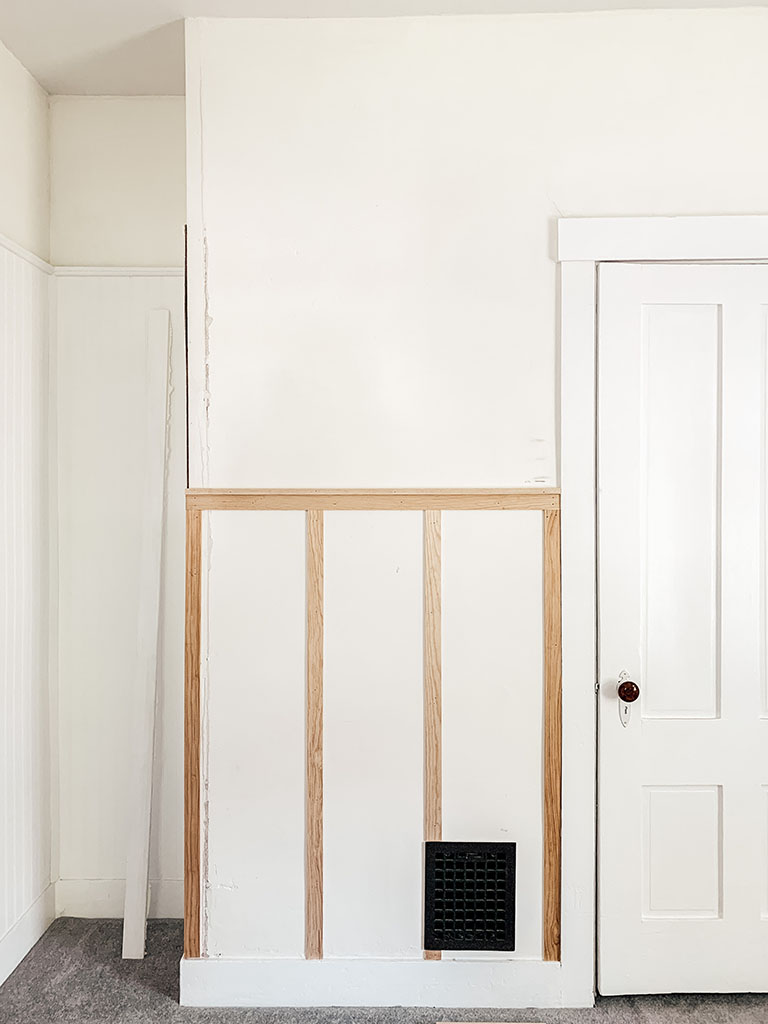
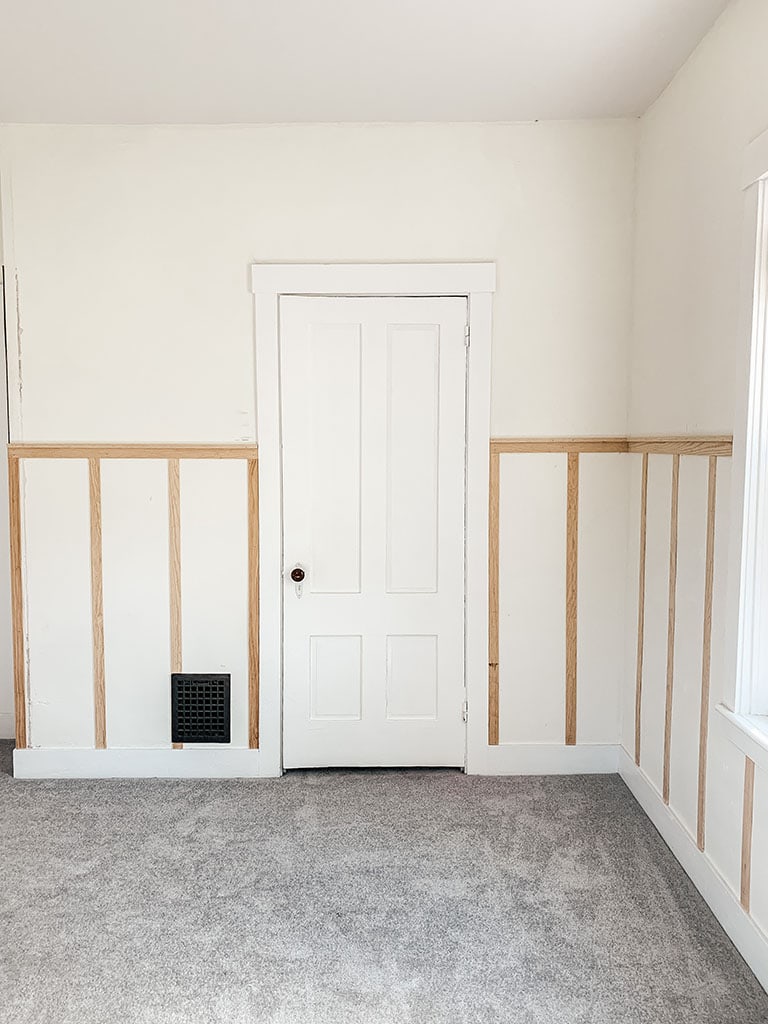
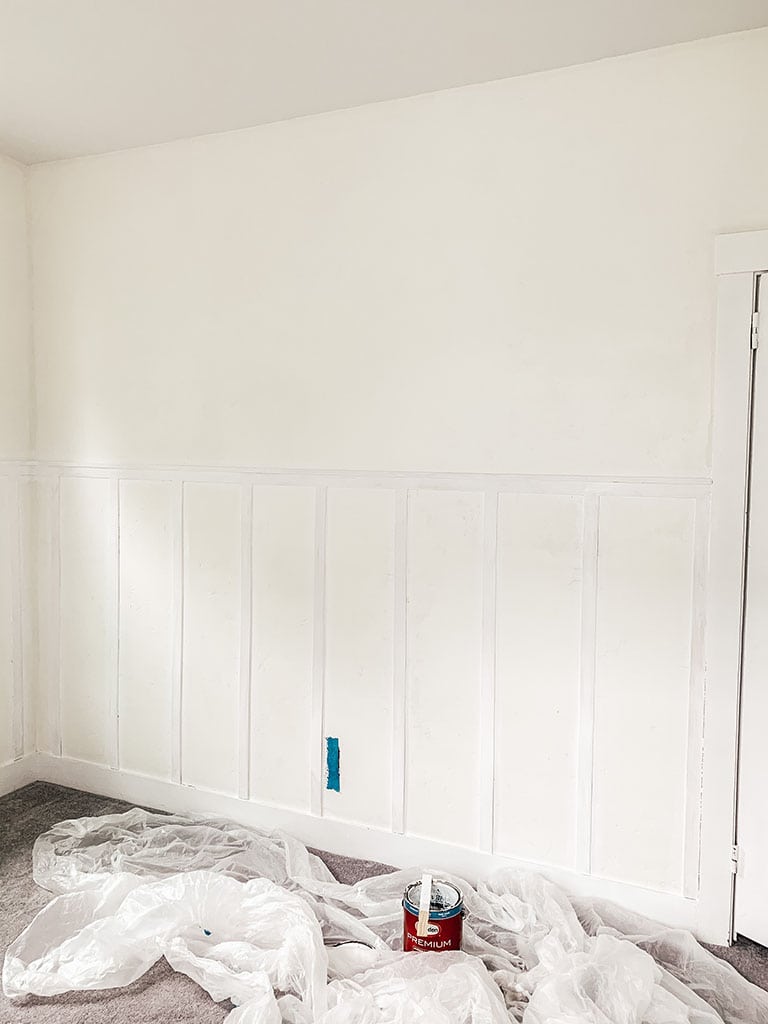
Before
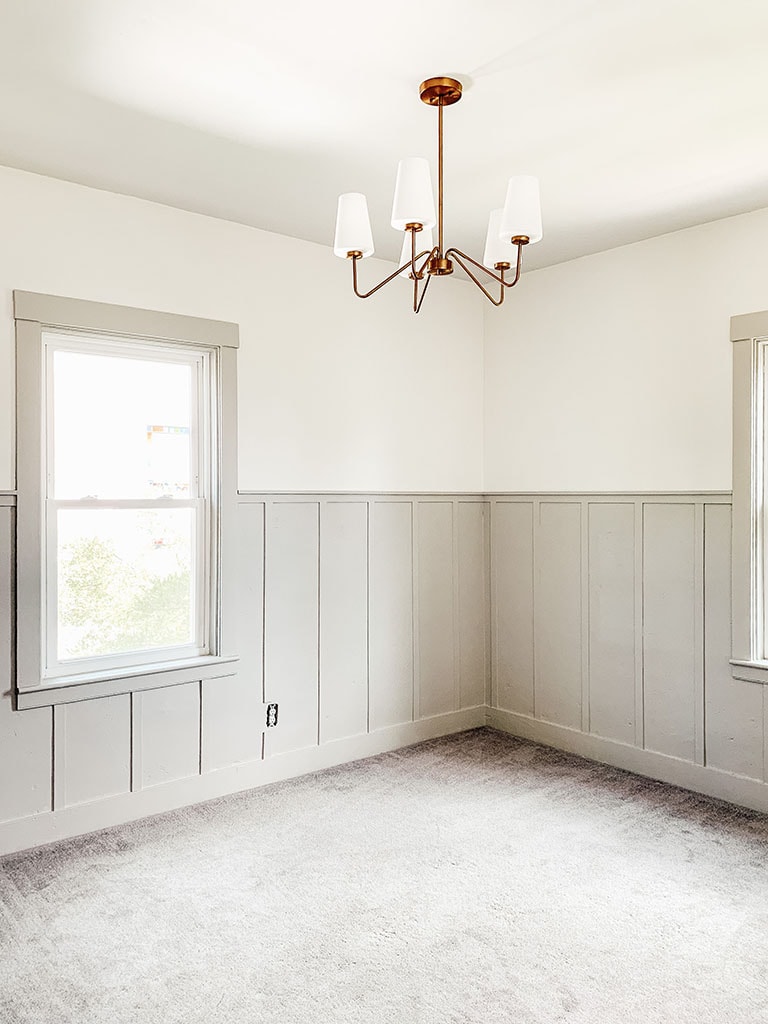
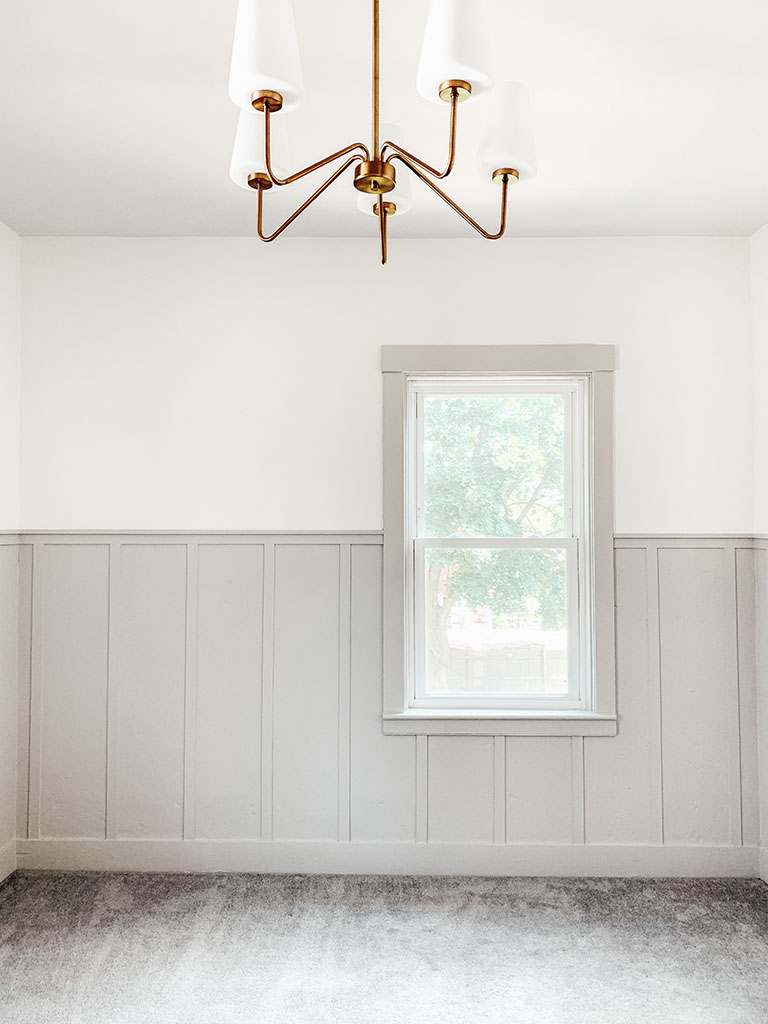
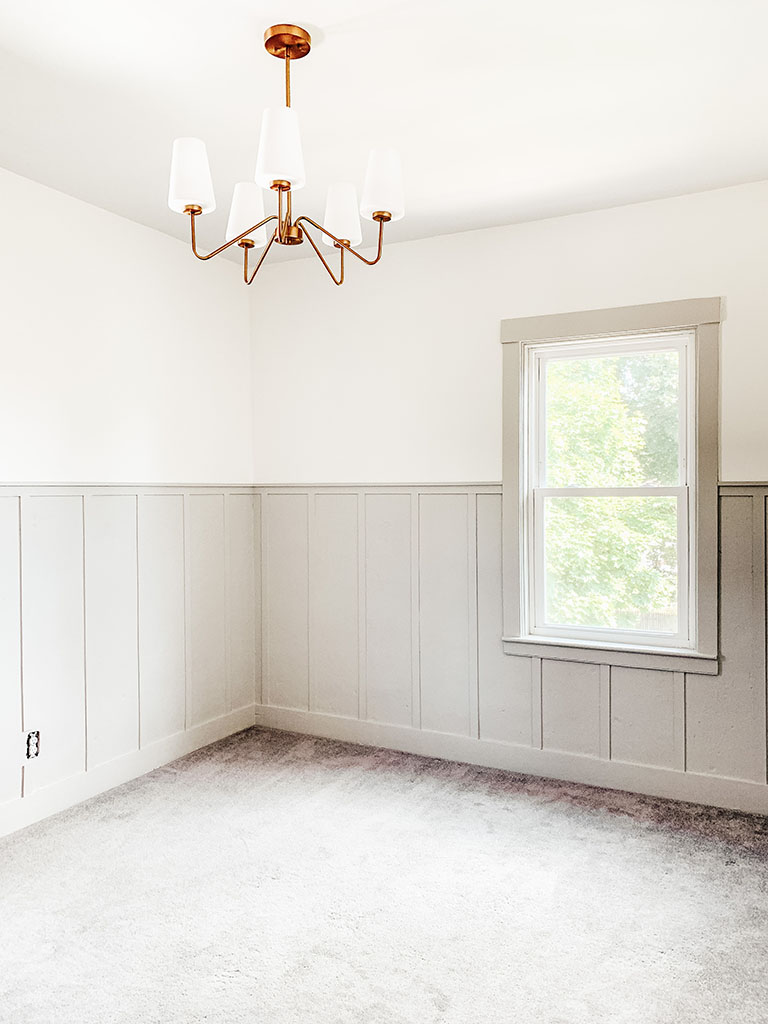
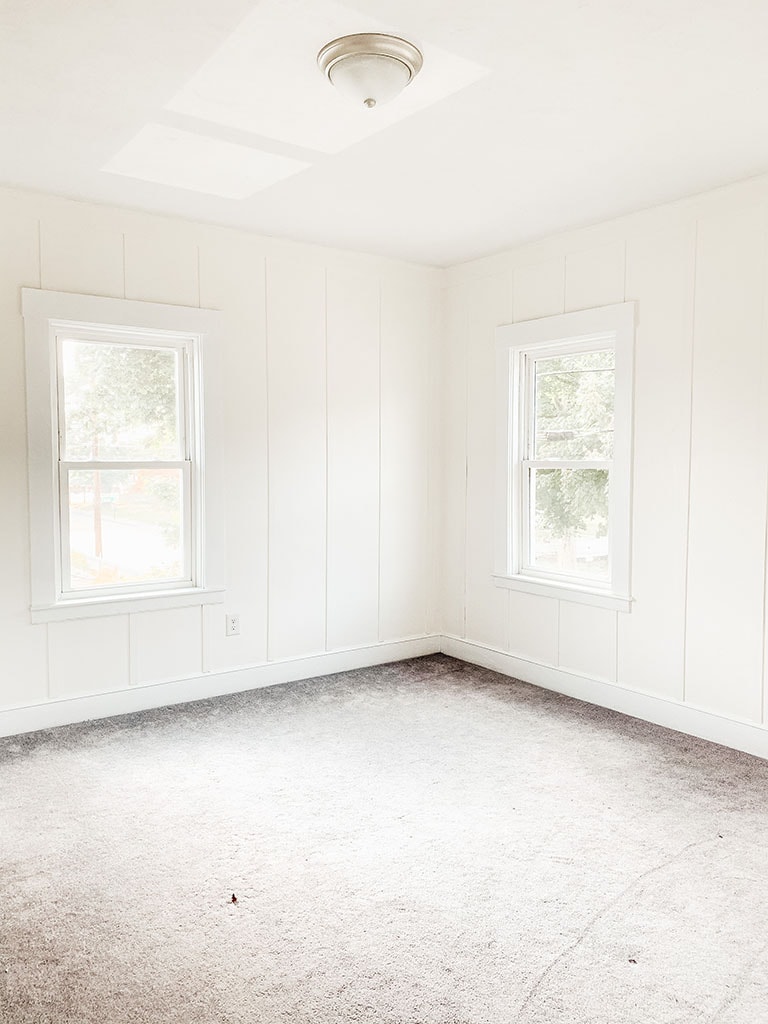
After
DIY Board and Batten Tutorial
Material List:
“Affiliate links provided for your convenience, please read my disclosure for more information.”
Amounts will vary depending on the size of your room.
We purchased the majority of the items from Home Depot. I highly recommend ordering from this list online and picking it all up in-store or having it delivered. This saves so much time. We had our material delivered right to our door.
Ready to tackle your first DIY project but not sure where to start? The right tools can make all the difference.Here’s our list of the best DIY tools for beginners, affordable, easy to use, and perfect for building your toolbox.
I have shared exactly what I used above. You will want to take a couple of things into consideration before determining what to use for your project.
There are many different ways to do board and batten. I wanted a skinny board and batten look. And I wanted it to work with our existing baseboards and window trim. I went with a pine lattice molding that is only 1/4 inch thick and about 1-1/2″ wide. This made it so that we would not have to worry about it overhanging our baseboards or window trim. We also didn’t have to cut the bottom at an angle. Saving time and money.
If you have baseboards that are deeper, you may be able to use a wood board that is thicker without needing to make any modifications. This will however, give the board and batten a completely different look.
In the end style and ease of use are the best way to determine what wood works best.
Can you do board and batten on textured walls?
Next, you will need to determine if you need to do a backboard first, which is basically just a large flat panel. This will be based on what kind of walls you have. If you have nice, smooth walls, you will not need to use a backboard. You can just attach the board and batten directly to the wall.
We have slightly textured walls and decided not to use a backboard. I don’t mind having a little texture. If your walls have a lot of texture, you might want to consider using a backboard to smooth it out.
Finishing Details
To finish off our board and batten, we decided to add a cap at the top. This gives you a nice finished look. I went with a 3/4 inch square molding. If you choose a thicker board, you will need to modify this.
Step Two: Measure Your Space
The first step in every project is to have a plan. This will help you determine how much material you need to purchase. When it comes to board and batten, you have a few decisions to make.
The first one is what height do you want your board and batten to be? In our case, we made this decision based on the materials we chose. We went with a 96-inch-tall lattice molding. To save on cost and materials, we decided that we would cut the lattice in half, giving us 48-inch pieces. This determined our overall height of 55 inches. ( this is from the floor to the top)
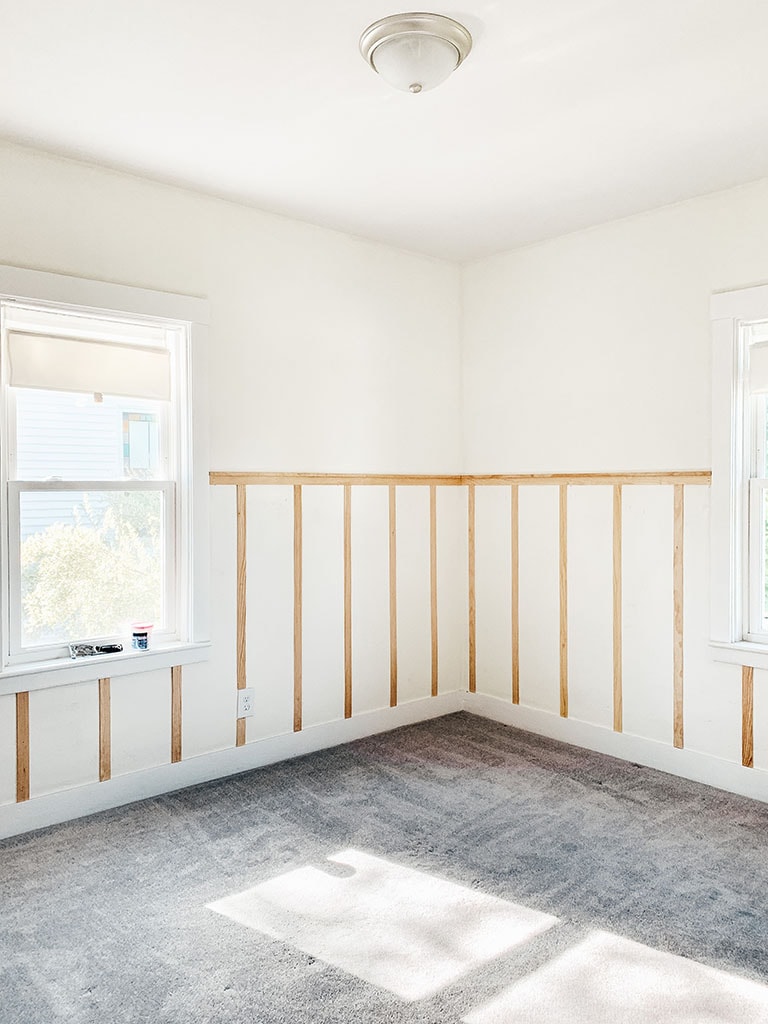
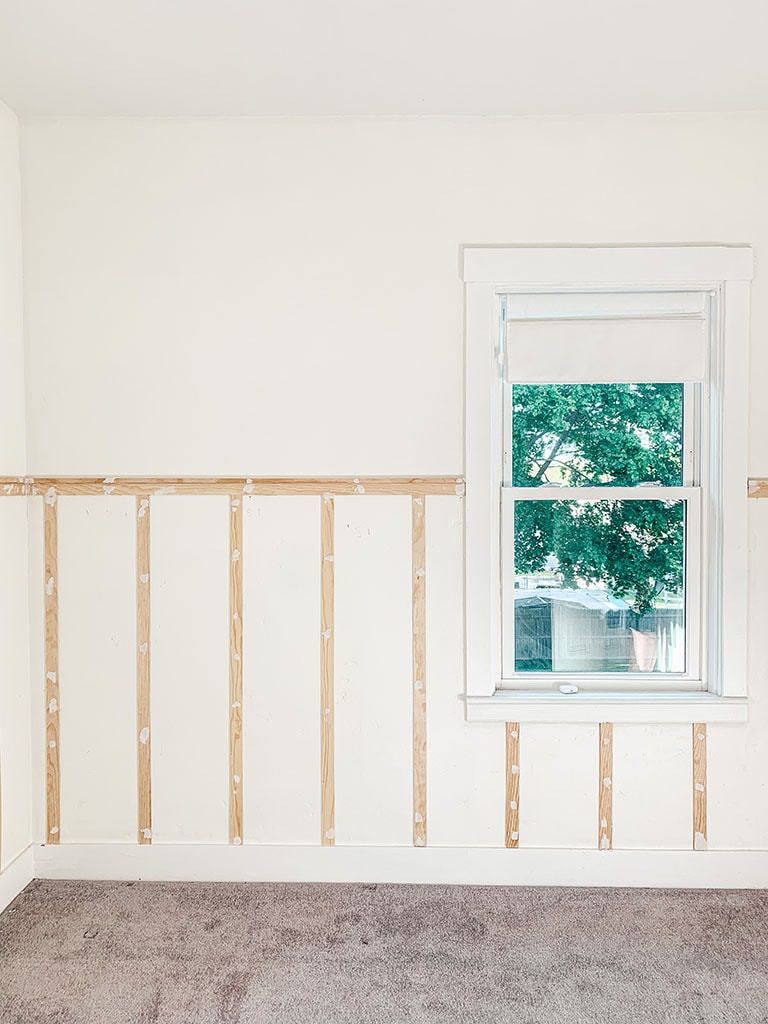
Once you have your height, you need to determine where you want your battens to start and how far apart you want them to be. Some will start in a corner and work out from there, but I wanted mine to start on the windows. I have two windows in my office, and I wanted the battens to be equally spaced on the windows.
I started in the center of the window and worked out from there. You need to determine where you will start on each wall based on the locations of windows and doors.
How far apart should board and batten be?
How far apart the board and batten can be is a personal preference. But there are a few things that you might want to consider. I based my spacing off of my window size, the location of outlets, and where they would end once it got close to the corner of the wall. In the end, I chose 11 inches.
I highly recommend planning out every wall so that you know ahead of time where the board and batten will fall. This will also help you determine how much material to buy.
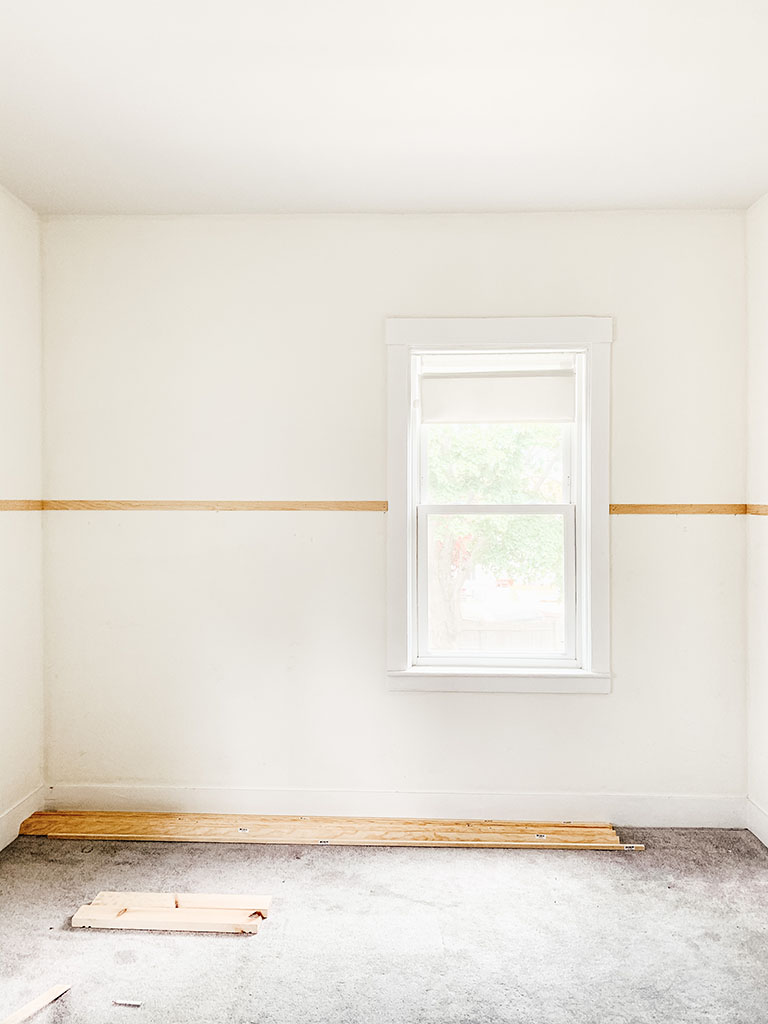
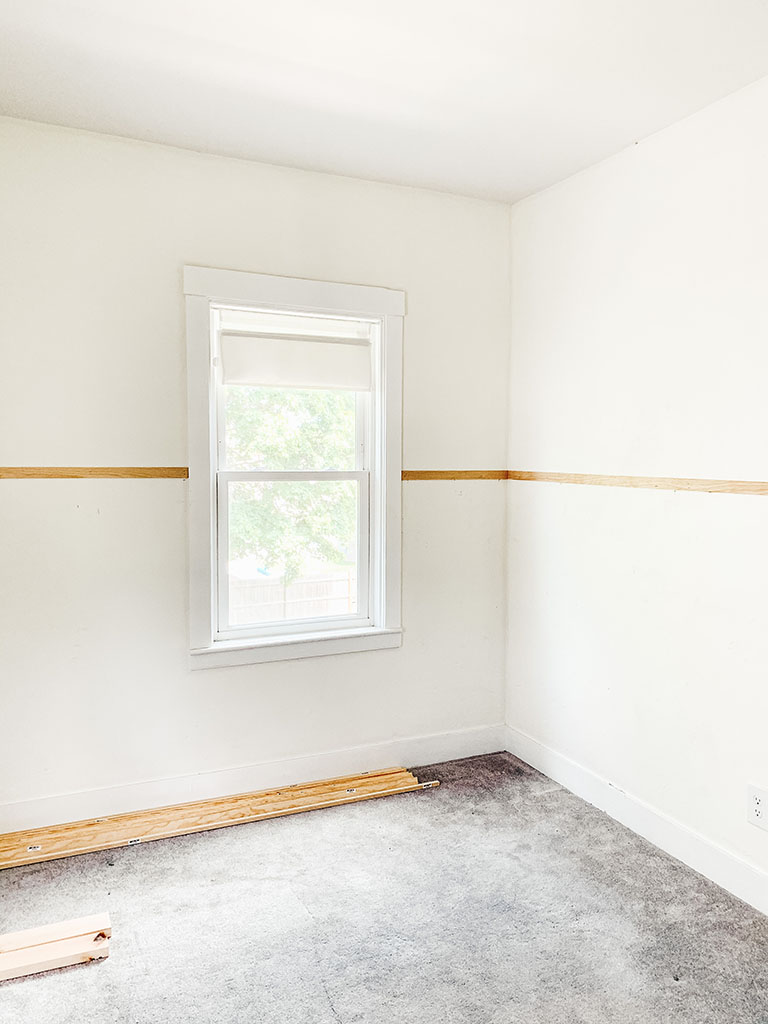
Step Three: Attach Board Around Perimeter
Now that you have a plan and all your materials, it’s time to get started. The best way to start is to attach your horizontal boards around the perimeter.
This will make it easy to know exactly how long to cut your vertical battens. Hopefully, they will all be the same size. But if your house is not level, you will have to adjust each one slightly. You will not know how much to adjust until your horizontal board is in place.
The best way to attach both your boards and battens is to use a nail gun and finish nails.
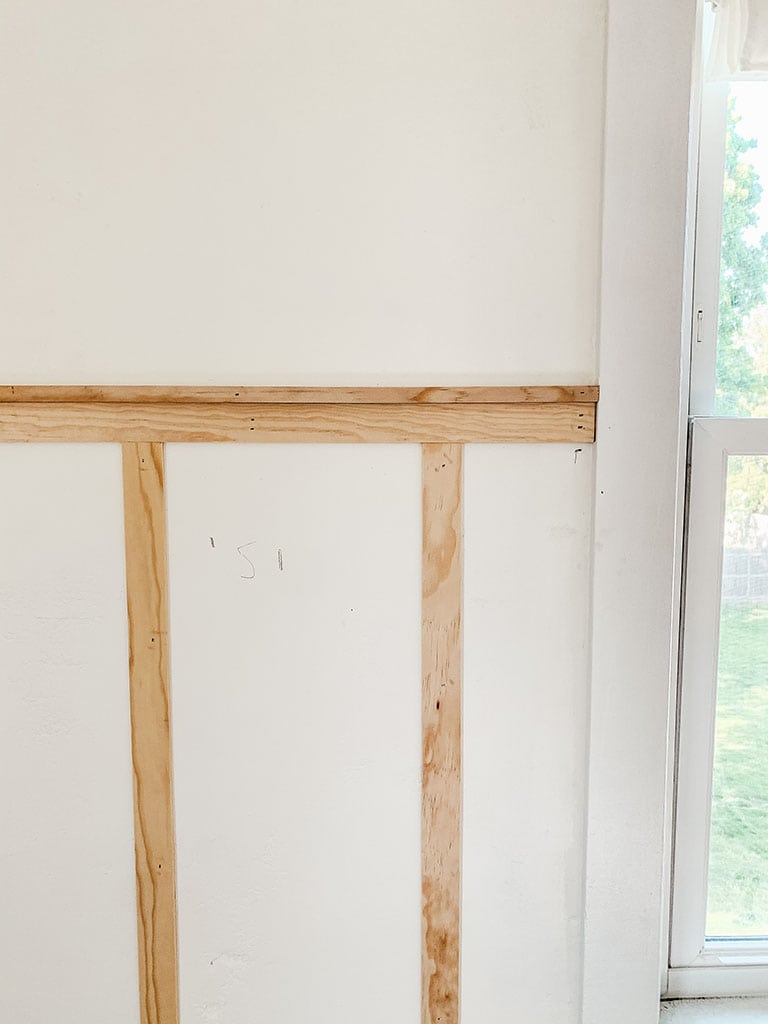
In order to place your first board, you must know the final height of your board and batten. Once you know that height, subtract the thickness of your cap piece and the width of your lattice molding.
This dimension will be the bottom edge of your horizontal trim. Mark all along the wall this height. When placing the horizontal board on these height marks, you may need to adjust slightly to ensure the board is level. When the board is perfectly level, nail it into place. Repeat this process for the entire parameter of the room.
Step Four: Attach Battens
After your horizontal boards are attached, it is time to attach your vertical battens. This is when you need to go back to your design plan that you created in step two.
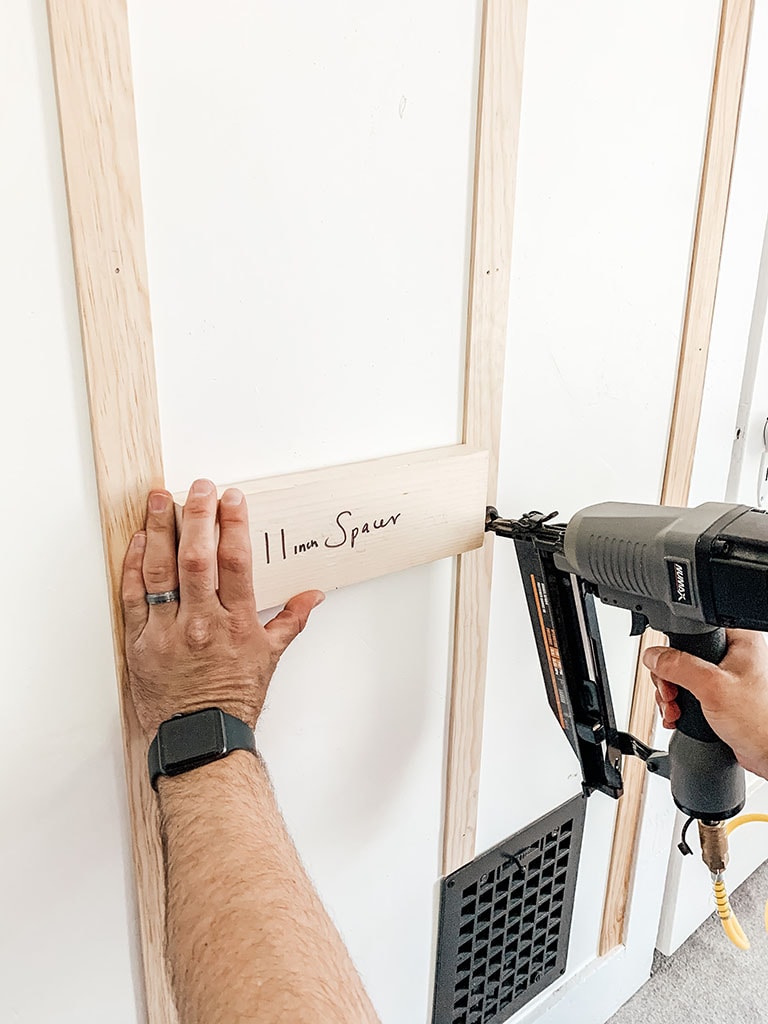
You should have already decided exactly where you want to start your battens on each wall and determined the spacing. The easiest way to space out your battens is to create a spacer using scrap wood. This allows you to quickly install the battens without having to measure each time. We decided to have our battens be 11 inches edge-to-edge, so our spacer was exactly 11 inches.
We started either at the center of the window or at the edge of a door, depending on the wall. After you cut your batten to size using your miter saw. You will want to make sure that each batten is level, and then you will attach it using a nail gun with finish nails. We used about 5 nails per batten, evenly spaced.
Step Five: Add Cap
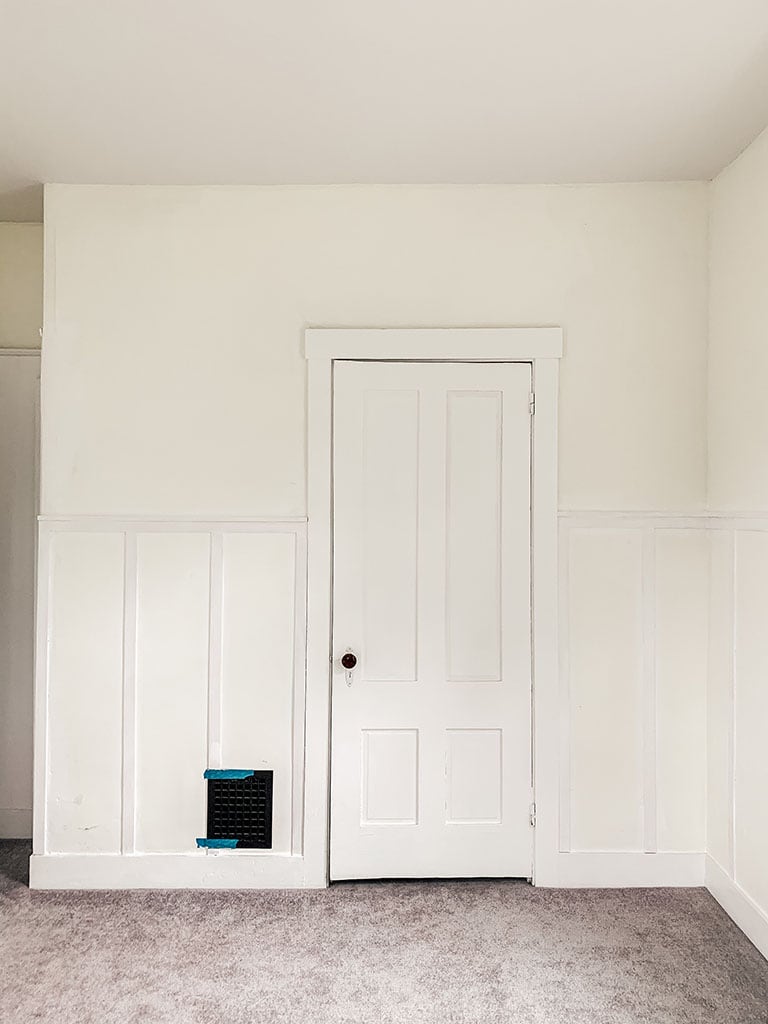
Once you have your boards and battens up the final piece to add will be your cap. This is going to finish off your board and batten.
Similar to how you installed your horizontal boards, you are going to go around the perimeter. This time though, you don’t need to measure. You can just place the cap right on top of your horizontal board and use finish nails to attach it to the wall.
This is an optional step, but I love how it completes the project. You can also do a deeper ledge to make it more functional for displaying art or accessories. I just wanted it for the detail.
Step Six: Fill Holes & Gaps
Next up is filling all the holes and gaps. To fill those small nail holes, you can use spackle, leaving a bit extra over the nail holes.
One tip with spackling is not to try and scrape the spackle flush with the surface. It will shrink a little and leave a small divot. Leave extra so that it can be sanded perfectly flush when the spackle is dry.
There may be some gaps in the board and batten. You can take paintable window/trim caulkand fill any gaps in the molding. You do not need to do it on every edge; just fill it where needed.
Once the spackle is dry, I recommend using a power hand sanderto sand all fill flush.
Step Seven: Prime & Paint
The last and final step is to paint. You will want to first start with a primer. We used Glidden pure white and painted one coat on all the boards and battens.
After priming, we started with the top half of the wall first. For this, we went with Benjamin Moore Simply White. Start by painting all the edges, including the ceiling edge, with a brush. Since the board and batten haven’t been painted yet, you do not have to worry about a clean edge when you get to that part. After edging the walls, you can paint the rest with a roller. We did two coats.
Next, we painted the board and batten, doors, and all the trim. We used Magnolia Home Yarn and ordered it online. I could not find it at a store near me. This color is so pretty and even better than I thought it would be.
All the trim received two coats of paint using a hand brush, and then we used a roller to paint the wall in between the board and batten. This is probably the most time-consuming part of the project.
After a final inspection and a few touch-ups, you are done! Easy and inexpensive DIY board and batten.
This DIY board and batten project added so much character to this space. I have a feeling I will be using this in a couple more rooms! If you have any questions about the tutorial, please leave them in the comments.
Very nice! What a difference it really makes. We have board and batten in a 40ft hallway. I’ve made it a picture gallery on each side. Ours is thicker strips but I really prefer the look of thinner like yours. Thank you for the tutorial! Your home is beautiful.
I love the colors you chose! We just did our kitchen cabinets in Yarn, too! Can you tell me what color/brand your carpet is? I am in desperate need of new carpet and the colors you have are prefect !
This turned out beautiful! Thanks for the tutorial! I’m assuming since all the battons were evenly spaced they weren’t all attached to studs. Did this cause any issues getting them to hold? Thanks!
Hi! We are do it yourselfers but have a dilemma. We don’t think we can get the proper spacing in our den, where we have two different sized windows on two different walls. Any suggestions?
Hi Laurie, I would have to see the space, but it doesn’t have to be perfect its all about picking a starting point and a width and going from there. its ok that your windows are different sizes.
It would be perfect for a powder room. It took about 2 days to do the trim and another 2 days to paint. This would vary based on the size of your room of course. Hope that helps.
I am obsessed with how this turned out! We are doing some home projects this year & I would love to do this in our guest bedroom. We are doing some kitchen cabinet refinishing next week so maybe this could be our next project after that. Thanks so much for sharing!!!
This turned out so amazing!!! It made such a huge difference in your space. We are making a list of home projects to do this summer and will have to add this to the list. Hopefully, we can do some kitchen cabinet refinishing too! Thanks so much for sharing!
This is beautiful! How did you treat your switch plates in the end? Did you paint them the color of your board and batten or leave them white? I’m not sure what to do for my own project. 💜
Hello! This is my first big DIY project. I plan to use wallpaper on the top half of the wall. Do you suggest papering before or after instillation of the board and batten ?
Our baseboards have a very thin edge. In some places it’s not even 1/4 of an inch. What would you recommend doing at the bottom of the wall in this case?


Very nice! What a difference it really makes. We have board and batten in a 40ft hallway. I’ve made it a picture gallery on each side. Ours is thicker strips but I really prefer the look of thinner like yours. Thank you for the tutorial! Your home is beautiful.
Hi! The link to the trim paint is broken… is this the “Yarn” color from Joanna Gaines’ Magnolia line?
Thank you for letting me know. Yes, the paint color is Yarn by Magnolia Home. You can purchase directly from the Magnolia Home Website.
What type of sheen did you use for your paint?
We used eggshell for all of it. I would typically switch to semi-gloss for trim but I wanted the color to be the same and it is a small room.
Hi can you link to the chandelier? Thank you 🙂
Here is the link to the chandelier: https://rstyle.me/+dYMDeM0XaX4sLw7HOOejUw
Hi love this remodel, so beautiful! Could you provide a link where the light fixture is from?
Here is the link: https://rstyle.me/+1a1YMyhpdI5mX3erNTBtGA
Hi there, do you have to use a nail gun, or is it possible to use nails and a drill if we align the batten with studs?
You do not have to use a nail gun but I highly recommend it. It would have taken us forever without it.
I love the colors you chose! We just did our kitchen cabinets in Yarn, too! Can you tell me what color/brand your carpet is? I am in desperate need of new carpet and the colors you have are prefect !
Yarn is such a great color! The carpet was here when we moved in so unfortunately I do not have the details for it.
This turned out beautiful! Thanks for the tutorial! I’m assuming since all the battons were evenly spaced they weren’t all attached to studs. Did this cause any issues getting them to hold? Thanks!
Hi Kate! The battens are not attached to studs. They are nice and thin and attach fine just right to the wall, no issues with them holding up.
Is your wall just Sheetrock and studs? I’m trying to find out if I can use the nailer in Sheetrock alone?
Small finish nails can be used without a stud. When installing board and batten it is almost impossible to always land on a stud.
Hi! We are do it yourselfers but have a dilemma. We don’t think we can get the proper spacing in our den, where we have two different sized windows on two different walls. Any suggestions?
Hi Laurie, I would have to see the space, but it doesn’t have to be perfect its all about picking a starting point and a width and going from there. its ok that your windows are different sizes.
Absolutely love what you’ve done here! It looks so lovely 🙂 can I please ask where your ceiling light is from? It’s lovely! Xx
Thank You. Here is the link: https://rstyle.me/+1a1YMyhpdI5mX3erNTBtGA
Hi, did you use 1-1/4” x 16ga nails?
Yes, the finish nails listed in the post are the exact ones we used.
I love this! I’m planning on doing it in a powder room. How long did it take you to complete start to finish?
It would be perfect for a powder room. It took about 2 days to do the trim and another 2 days to paint. This would vary based on the size of your room of course. Hope that helps.
I am obsessed with how this turned out! We are doing some home projects this year & I would love to do this in our guest bedroom. We are doing some kitchen cabinet refinishing next week so maybe this could be our next project after that. Thanks so much for sharing!!!
This turned out so amazing!!! It made such a huge difference in your space. We are making a list of home projects to do this summer and will have to add this to the list. Hopefully, we can do some kitchen cabinet refinishing too! Thanks so much for sharing!
This is beautiful! How did you treat your switch plates in the end? Did you paint them the color of your board and batten or leave them white? I’m not sure what to do for my own project. 💜
We painted them the wall color.
So do you have to use glue in addition to nails if applying to drywall and not on a stud??
No, finish nails will keep them in place.
Do you have a recommendation on what to use for a backboard?
What color is the ceiling color? Looks different from the wall and board and battens!
Our ceiling is a flat Glidden Pure White GLN6211N, but you can use any pure white for the ceiling just make sure the finish is flat.
Hi! This looks fantastic! What did you do about the door and the trim around the door?
That is our existing door and trim. I just painted them to match the board and batten.
Hi! What height are your ceilings in this room?
Hello! This is my first big DIY project. I plan to use wallpaper on the top half of the wall. Do you suggest papering before or after instillation of the board and batten ?
I would install the wallpaper first!
What type of trim do you have around your window and doors ?
These are original to the house and 150yrs old I’m not sure what type they are.
Our baseboards have a very thin edge. In some places it’s not even 1/4 of an inch. What would you recommend doing at the bottom of the wall in this case?
love this! how tall are your baseboards?
5 Inches