DIY Shiplap Electric Fireplace & Mantel
Today I am sharing a step by step tutorial on how to building your own shiplap electric fireplace.
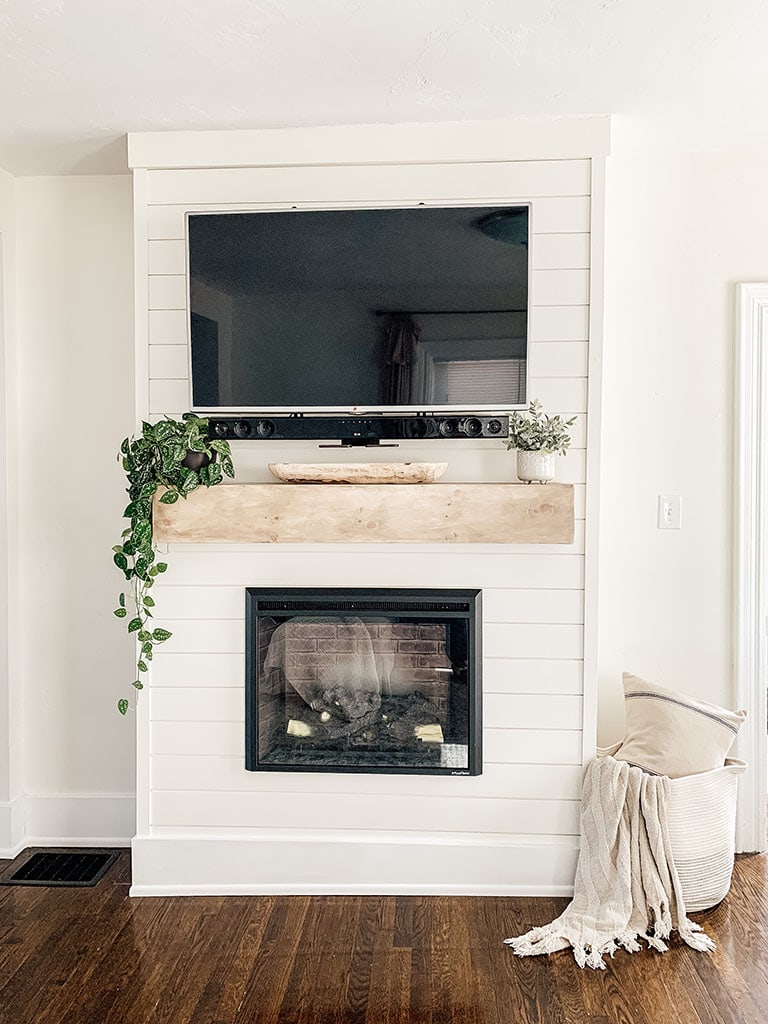
I am so excited about today’s post. A lot of love and labor went into this fireplace and we are so happy with how it turned out.
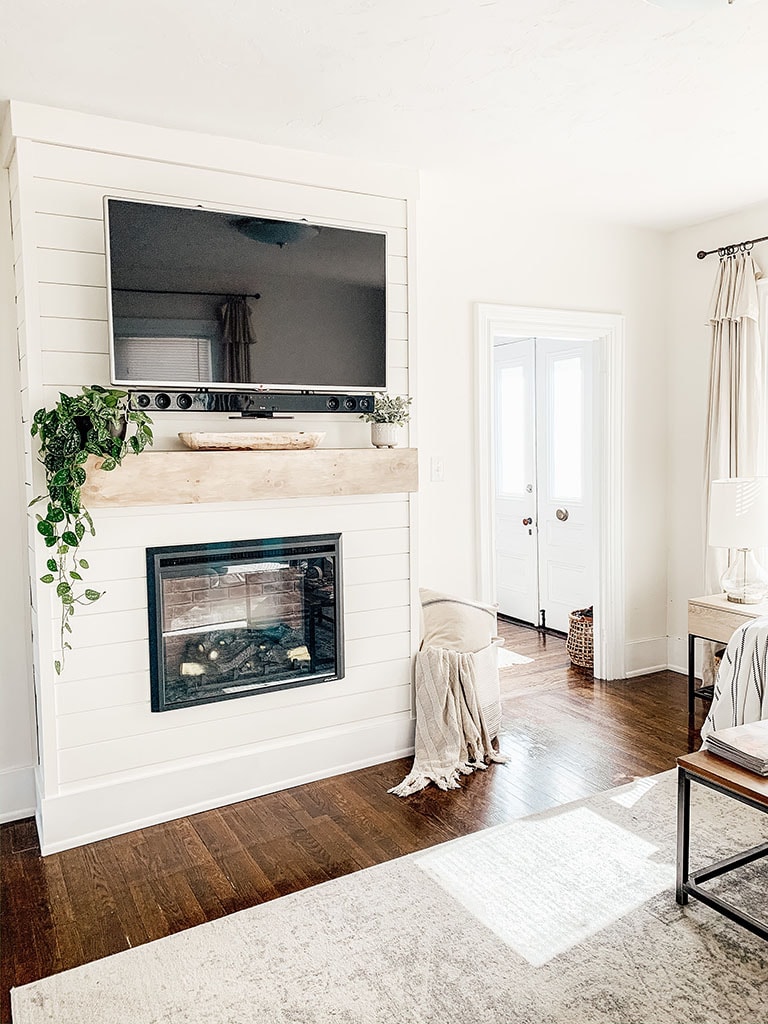
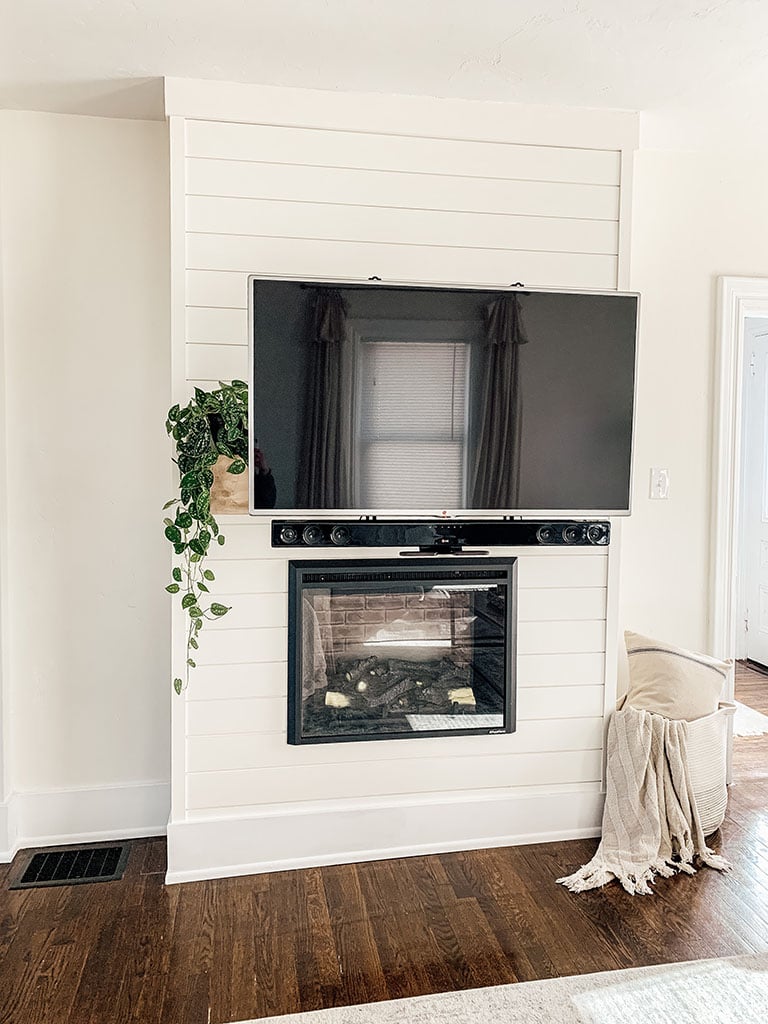
TV walls can be so hard to decorate especially when you have a larger wall behind it. This shiplap fireplace was the perfect solution. It made our space so cozy and filled a wall that would have otherwise been blank. It is now the best part of our living room.
This post is going to be an in-depth guide of exactly how we transformed our boring TV wall into a beautiful statement piece. We are not professional carpenters in any way. This project can be done by anyone with the desire to make a shiplap fireplace on their own. I hope that this guide will help you every step of the way.
Let’s get started!
Materials List
“Affiliate links provided for your convenience, please read my disclosure for more information.”
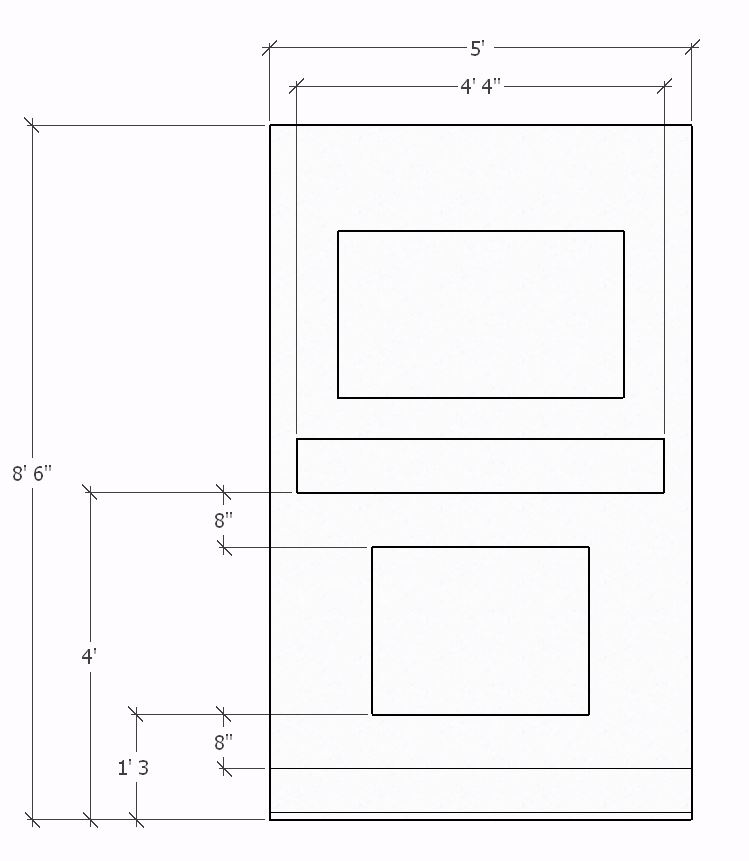
Amounts will vary depending on how big you want your fireplace to be. See step one to determine your materials. I have indicated the exact amount we used for a 5′ wide by 8′-6″ fireplace.
We purchased the majority of the items from Home Depot. I highly recommend ordering from this list online and picking it all up in-store. This saves so much time. All you have to do is show up and load it into the car.
Fireplace:
- (14) 2 in. x 4 in. x 8 ft. ( Framing)
- (4) 1 in. x 4 in. x 6 ft ( Anchor Boards)
- (1) 1 in x 4 in x 8 ft. ( Top Trim)
- (20 Boards) Shiplap
- (4) Lattice Molding
- (2) Inside Corner Trim
- Construction Screws
- Finish Nails
- Spackling Paste
- Secret Door Hinge
- Secret Door Latch
Fireplace Insert-We purchased the 30 inch one.
Mantel:
- (3) 1 in x 8 in x 6 ft common boards
- (1) 2 in. x 4 in. x 8 ft.
- Minwax White Wash Pickling
- Behr semi-transparent waterproof stain and seal tint base number 5077 in Cordovan Brown
- (2) Wood Veneer Sheets
Tools Required
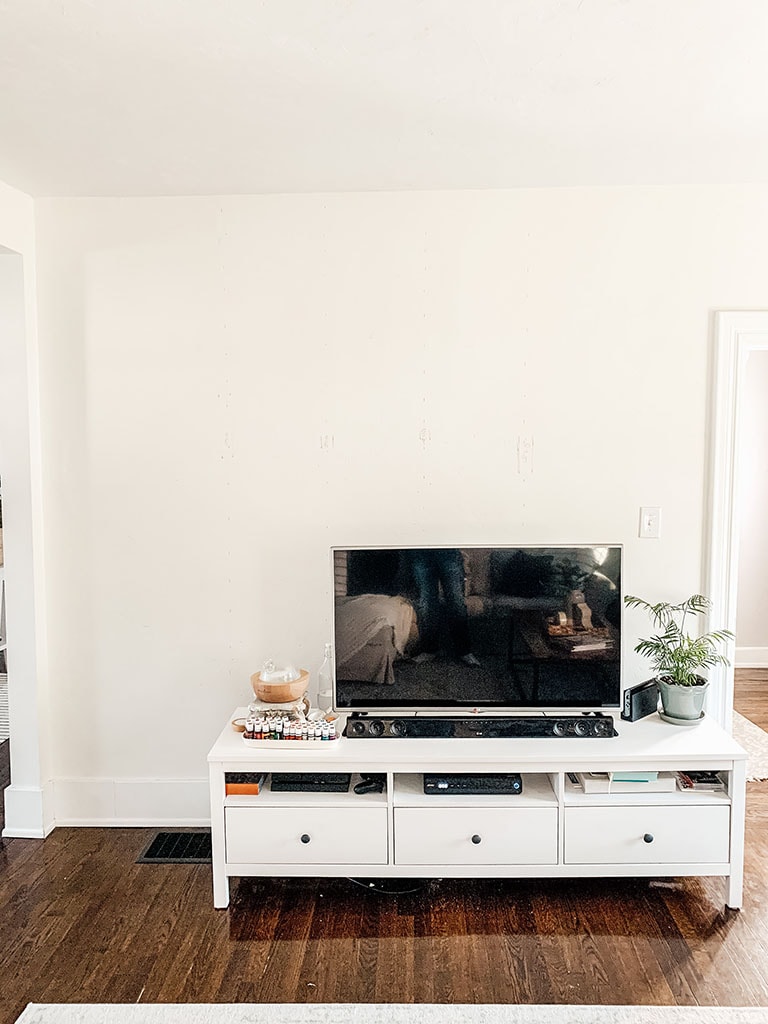
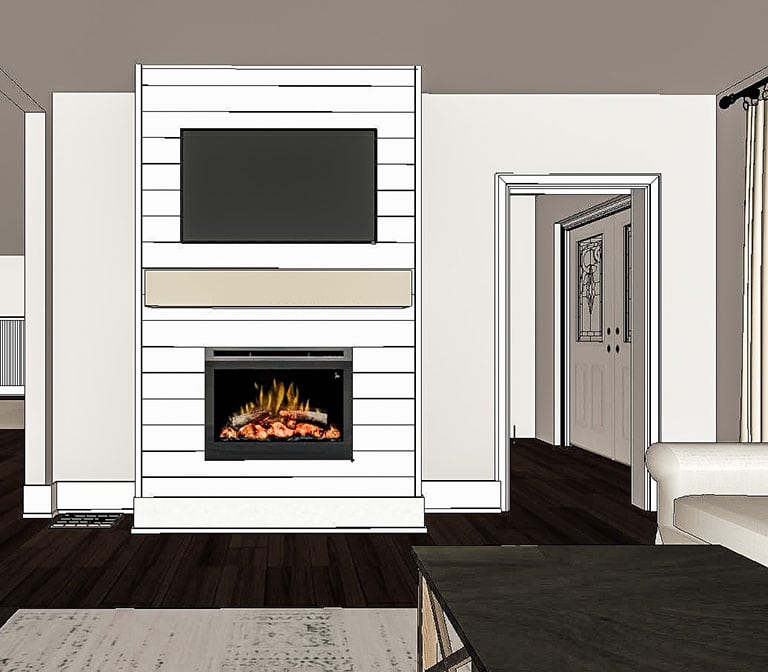
Step One: Design Planning
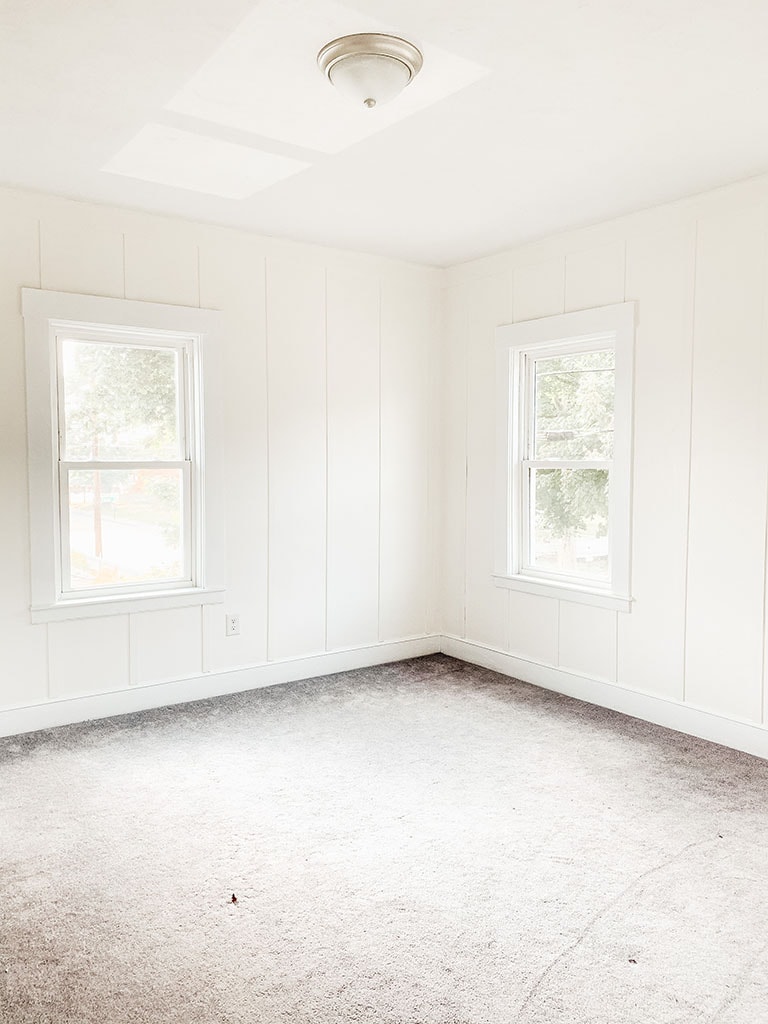
Before
Design Plan
Final Measurements
Step Two: Shiplap Fireplace Framing
To begin you will want to remove any pictures hanging. As well as any baseboard trim or crown molding that is on the wall you would like to have your shiplap fireplace. This will give you a completely blank wall to start with.
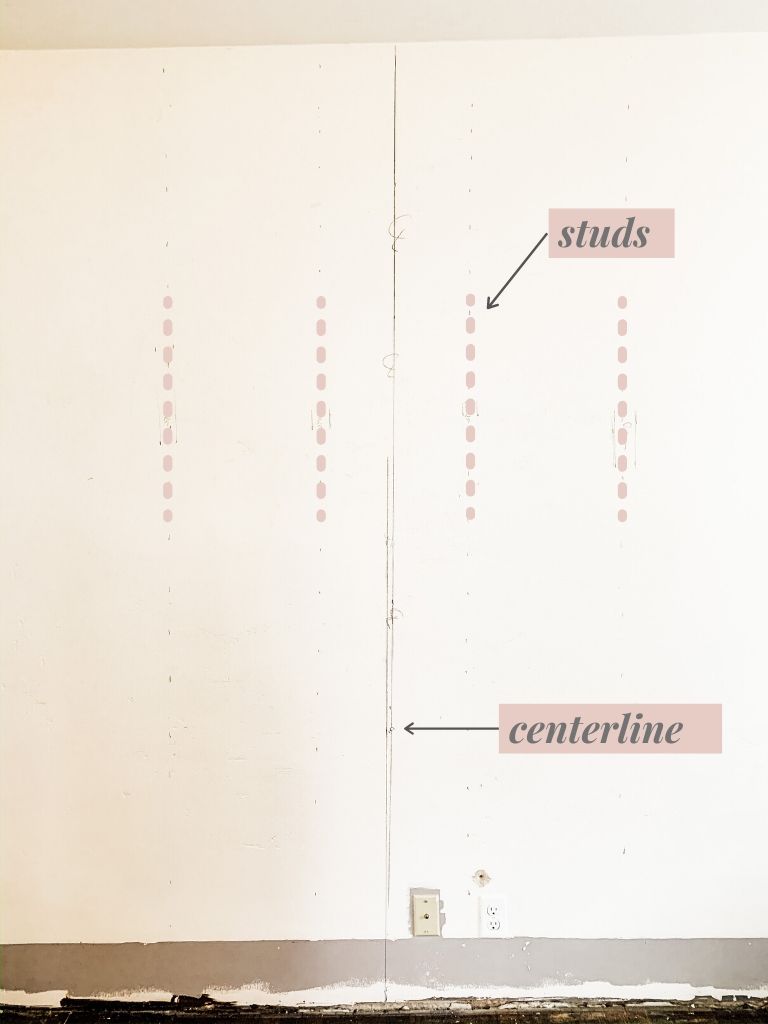
General Wall Marking:
Next, you will mark the center of the wall as well as the final width of the fireplace. Within the final width of the fireplace, locate and mark all studs in the wall using your stud finder. This is very important because the entire frame will be anchored to these studs in the existing wall.
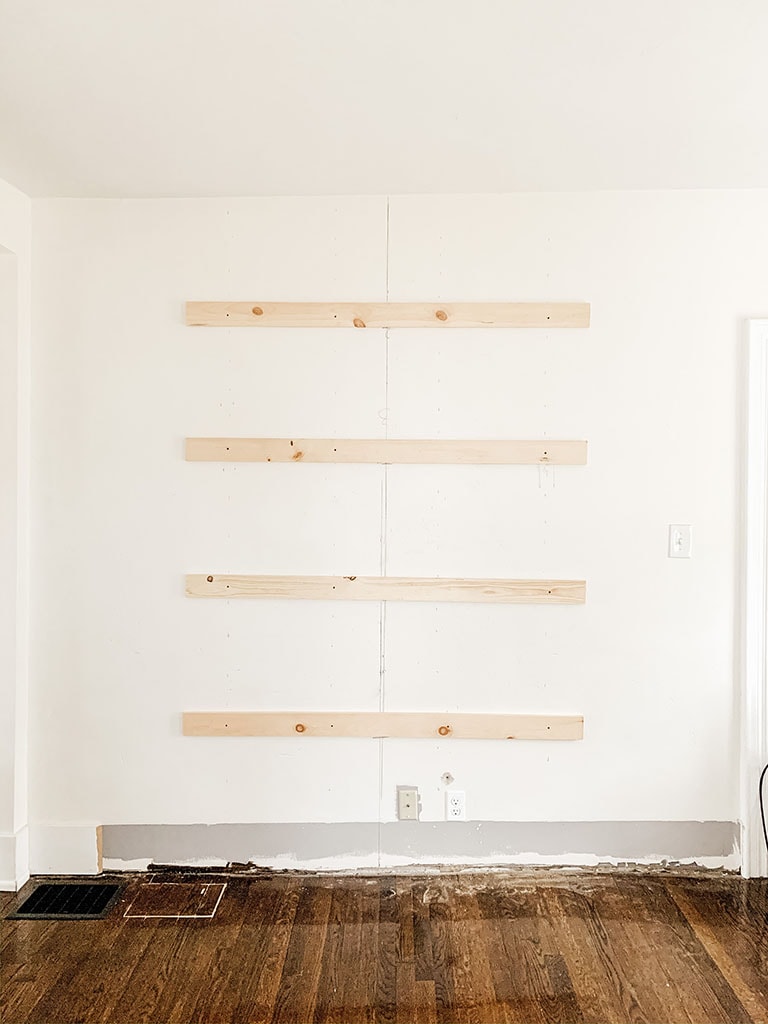
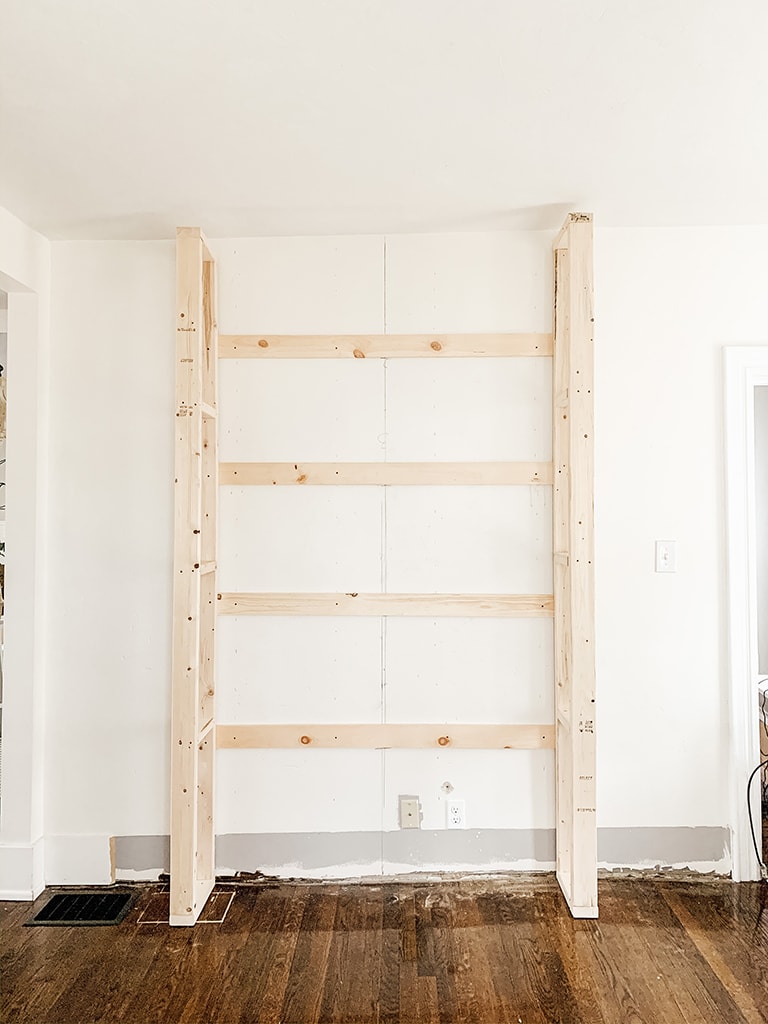
Anchor Boards:
Take your 1 x 4 x 6 boards and cut to the final width of the fireplace (in our case it was 5 ft ). Next, mark the center of these 1 x 4 boards. Measure the height from the floor to the ceiling and mark 4 equal spaces. This is where your 1 x 4 boards will be screwed in.
Align the center of the board with the centerline of the wall while also placing it at the appropriate height marked (4 equal spaces). Using your bubble level, cordless drill and construction screws, attach your 1 x 4 boards to the wall. Ensure that they are level as well as centered on the wall. You will repeat this three more times to create an anchor for the entire fireplace.
Sidewalls:
The next step is to build the sides of your fireplace. To do this you will need to know the height from floor to ceiling. If the height is greater than 8’-3”, you do not have to cut your 2 in x 4 in studs.
If the ceilings are shorter than 8’-3”, you will have to cut your studs. Take the height of your ceilings and subtract 3 in. This will give you the height of your vertical boards.
You will need (4) 2 x 4 studs, either full length or cut to length depending on your wall height. You will also need to cut (4) 2 x 4 studs that are the final depth of the fireplace, in our case, it was 12” ( Top and Bottom Plate). To ensure your side walls are extra sturdy you will need cut (6) 2 x 4 pieces and equally space them in the middle of your frame.
To construct the walls see the photo below.
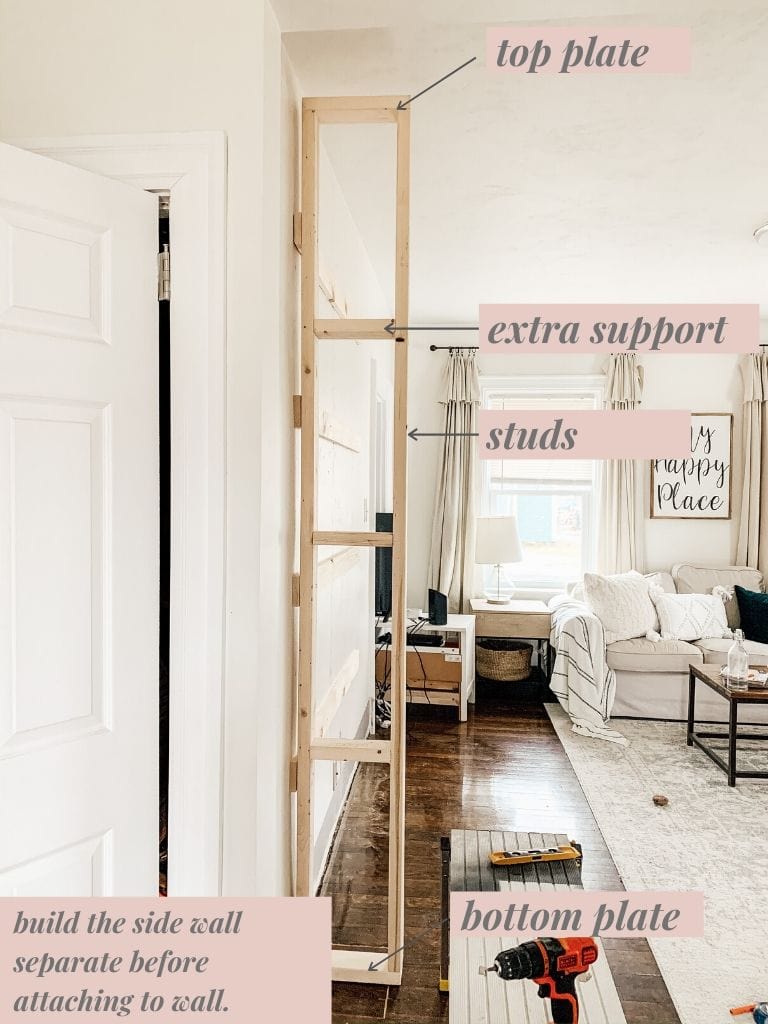
Take your finished walls and stand them upright, one for each side of the fireplace. Line up the outside edge of the mounted 1 x 4 board with the outside edge of your stud. This will ensure your edges meet the overall width of the final fireplace. Screw the walls through the studs into the anchored 1 x 4 boards already on the wall. You now have two side walls that will make up your fireplace!
Front Frame:
The front-facing portion of the framing gets a little more tricky. Here are a few things you will need to know before beginning.
- The final height of the bottom of the fireplace.
- The width and height of the firebox insert.
Based on these measurements you can begin the framing the front of the fireplace. You will build a box on the bottom, similar to how you built the side walls with 3 studs and a bottom and top plate. The final height of your box should go from the floor to the bottom of the fireplace opening. Insert this box and screw it to the side walls already in place.
Next, you will need (4) 2 x 4 studs cut to the height of the fireplace insert. Screw these (4) studs into the top of the box you have just built from the bottom. (2) on the sides and the other (2) the overall width of your fireplace insert centered. Then place (1) 2 x 4 stud cut to the entire length of the opening over the top of these (4) boards and screw into place.
See the picture below. (Please note: our home is 150 years old and a little crooked, so we compensated for the angle to make the fireplace level)

To finish the front frame you will need (4) studs. (2) for the sides and (2) 16″ on center. Then you will need to cut one final board for the top. You can build this portion of the frame on the ground. Once secure lift into place and screw into the side walls.
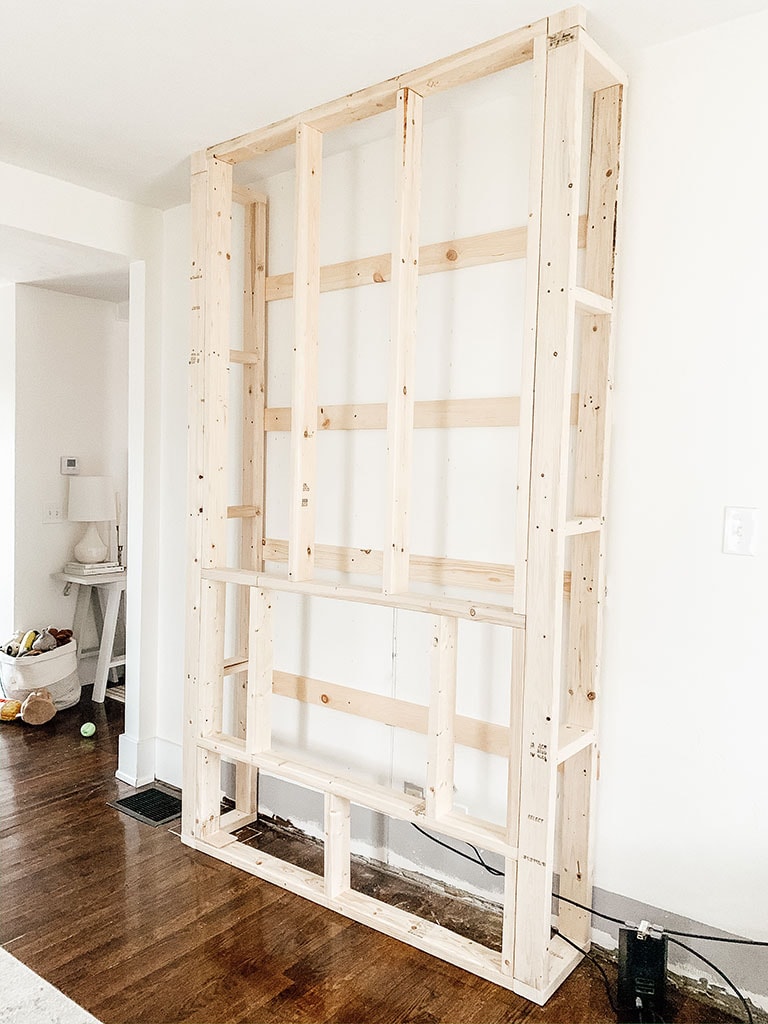
Congrats! You have a rough framed fireplace.
Step Three: Shiplap Fireplace Secret Door for Electronics (optional)
If you would like to cleanly hide all your electronics and have some patience, read on.
We were originally going to cut a hole in the shiplap behind the TV and create a shelf. But the TV mount that we wanted to use did not allow for that. So we decided to make a secret side door that we could easily access and that no one would see. It was tricky but we are so happy with how it came out.
We went through multiple revisions to make this seamless and working correctly.

Interior Shelves:
The shelves will house things like a cable box, router, DVD player or gaming system. Measure approximately where you want your door to go. This should be somewhere close to where the TV will go, while not being too high that it is out of reach.
Within the fireplace, framing add shelves by adding small lengths of 2 x 4 from the anchor wall to the outside stud and screw in place. Small pieces of plywood can be used to cover the shelves and create a solid surface.
The Base Door:
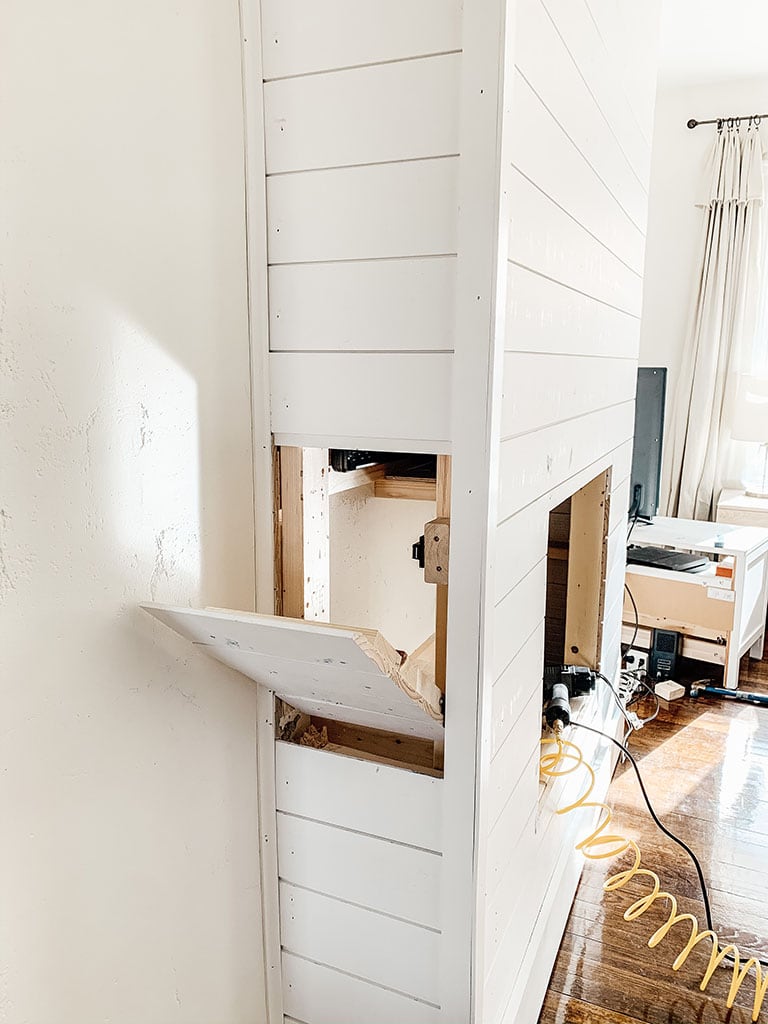
Adding Shiplap to Door:
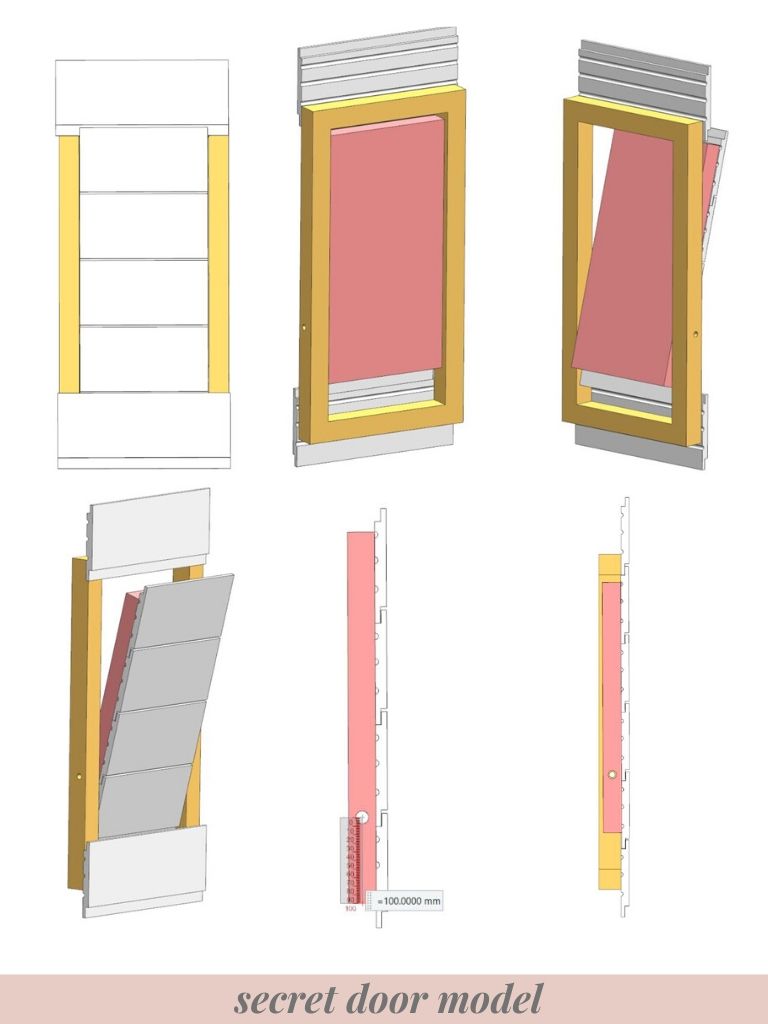
Tips on the secret door:
- Know where the door will go before you start adding shiplap to your fireplace and ensure the frame will work for the swing of the door.
- The last piece of shiplap bottom lip should be cut so there is clearance for the bottom of the shiplap to swing into the fireplace. Also, ensure your internal shelves work for this as well.
- Make the base door smaller than the opening height. This will allow plenty of clearance. The close-fitting part of this door should be the shiplap, not the base door.
- Be patient with this as it might take a couple of tries to get it just right.
- Also, plan out precisely where the magnetic latch will go. The goal is to close the door flush with the other shiplap and just connect with the magnet to hold it shut.
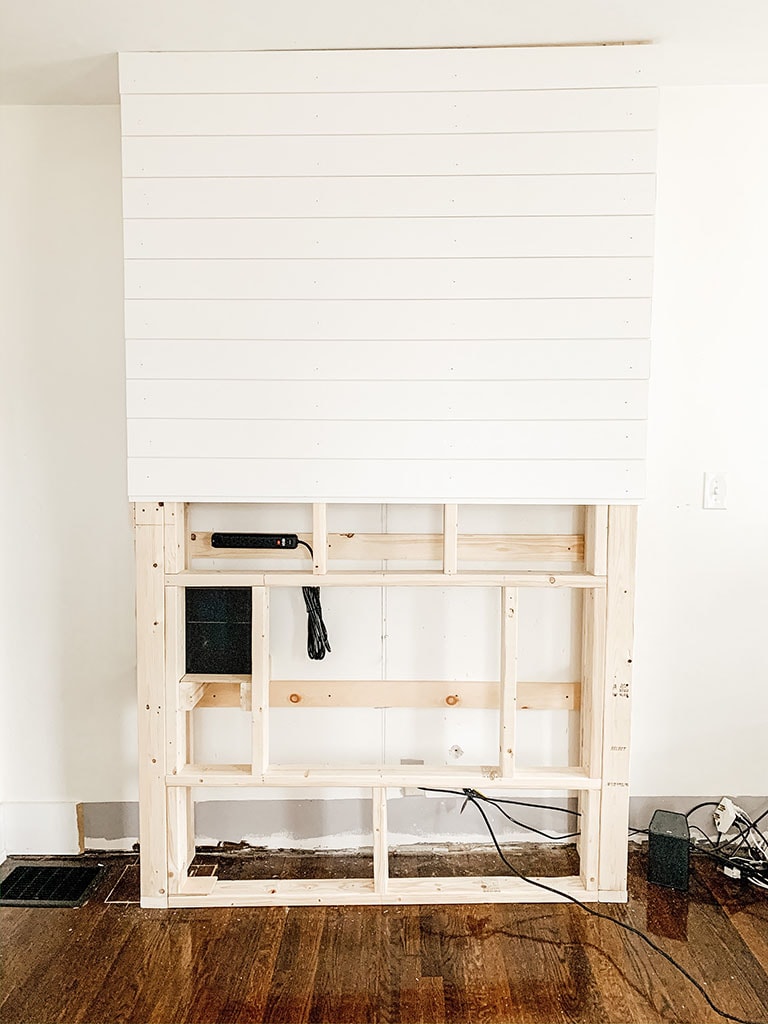
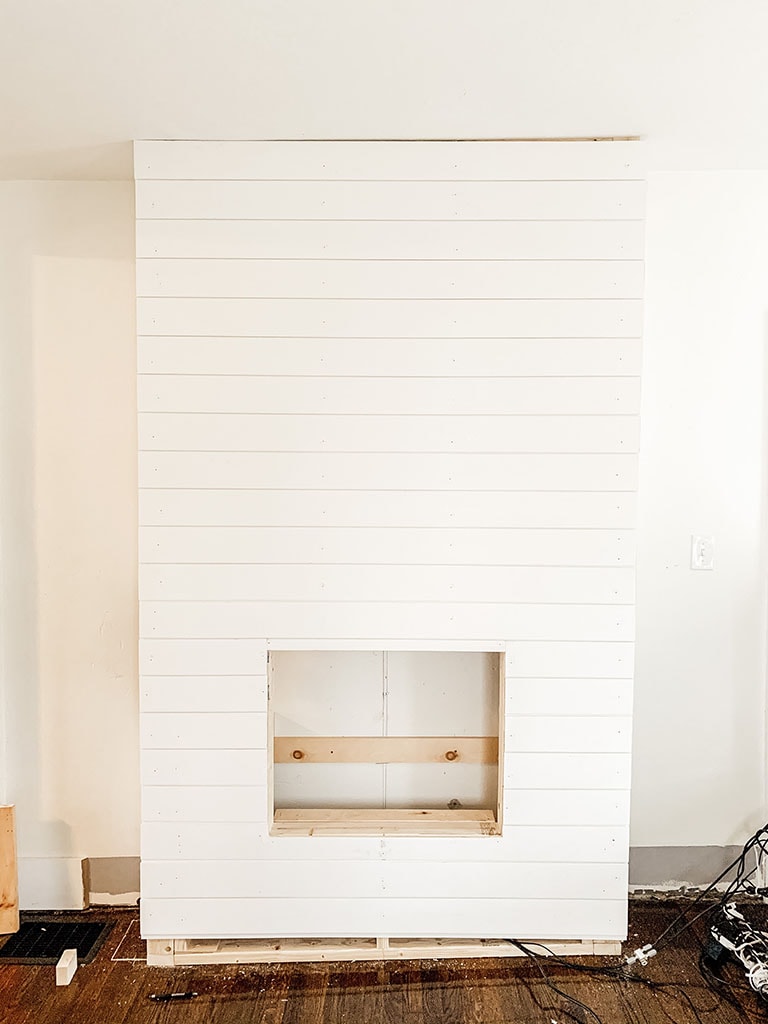
Step Four: Install Shiplap
-
Each board should be level. Make small adjustments along the way to correct any boards that are not perfectly level. (using the bubble level).
-
As you wrap the corners from one edge to another, ensure the shiplap gap lines up from the sidewall to the front wall.
-
When shiplapping the front of the fireplace, be sure to add additional length to overlap the sidewall shiplap pieces. This will ensure a square edge to put the corner trim against.
Step Five: Shiplap Fireplace Trim

Step Six: Fill & Paint
Fill all Holes:
At this point, you should have a pretty good looking fireplace, except for all those nail holes. You should fill those small nail holes with spackle leaving a bit extra over the nail holes. You can also take window/trim caulk and fill any bigger gaps in the trim.
One tip with spackling is to not try and scrap the spackle flush with the surface. It will shrink a little and leave a small divot. Leave extra so that it can be sanded perfectly flush when the spackle is dry.
Once the spackle is dry, I recommend using a power hand sander to sand all fill flush. You should use a shop vac/ home vac during this step because dust is going to get EVERYWHERE. Be prepared. Drop cloths over furniture can be particularly helpful.

Paint:
Once all spackle holes and caulk lines are dry and sanded flush it’s time to paint. Start by wiping down the fireplace with a damp cloth or paper towel to pick up any dust. This should also be done with a vacuum to pick up any lingering dust
Once all the surfaces are cleaned, pick up your favorite can of paint, matching the existing wall if desired. Run over the shiplap gaps with a brush first. Then a roller after. This will ensure the paint gets into the gaps for a uniform color coverage.
We used Sherwin William Alabaster for the shiplap to match our existing walls.
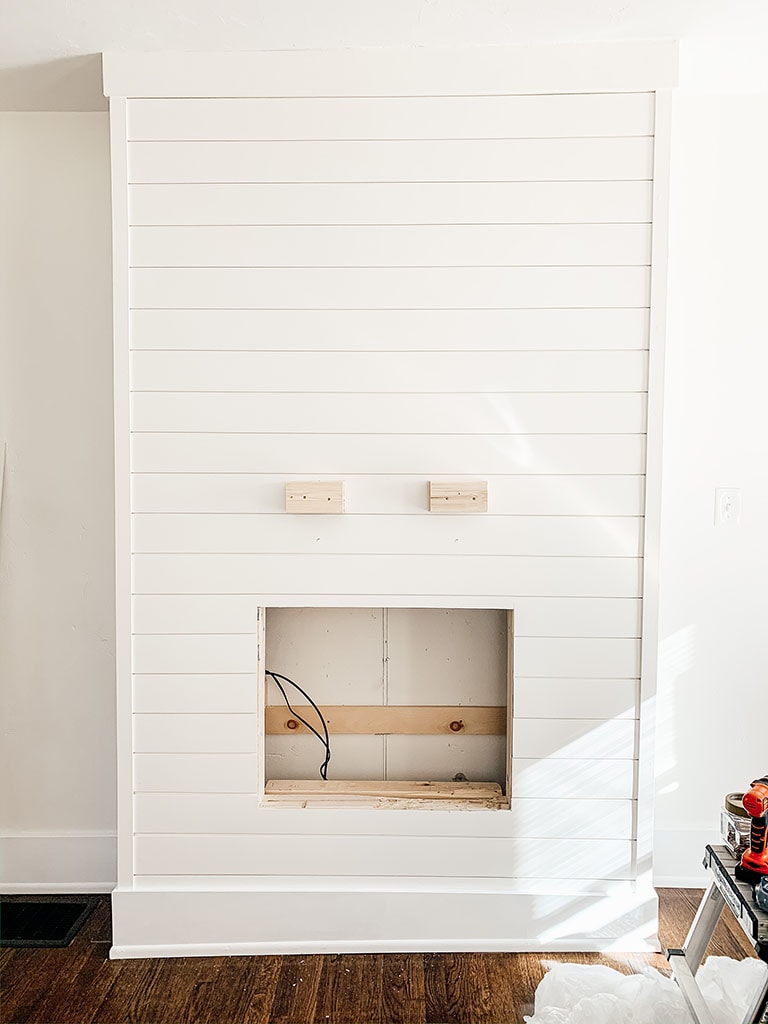
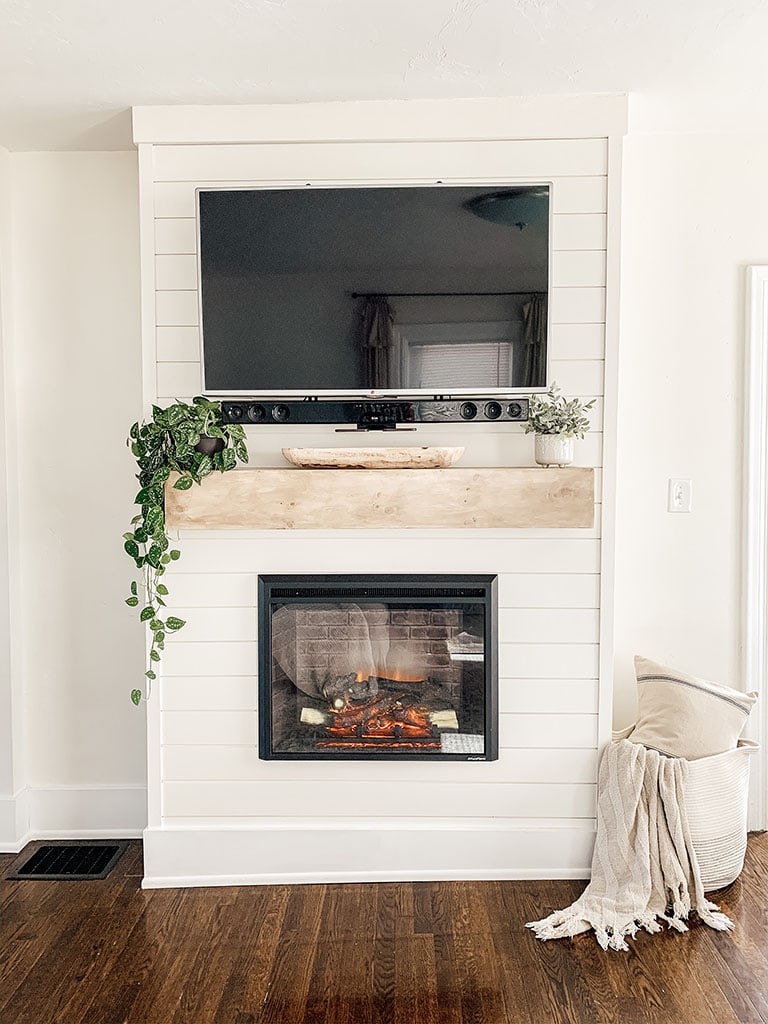
Step Seven: DIY Mantel
The mantle was constructed using three 1 in x 8 in x 6 ft common boards. Cut all three boards to length desired, we used 4 ft-4 in as the final width of our mantel. If you purchase 6 ft boards you should have some leftover.
You will need to cut 2 boards for the end caps. Once all your boards are cut, you can use a Kreg Jig or nail gun to assemble. We choose to use Kreg Jig and Kreg screws because you end up with a flush outer surface and no nail holes. If using a Kreg Jig, drill holes for the inside edges and mate each board with the proper length screws.
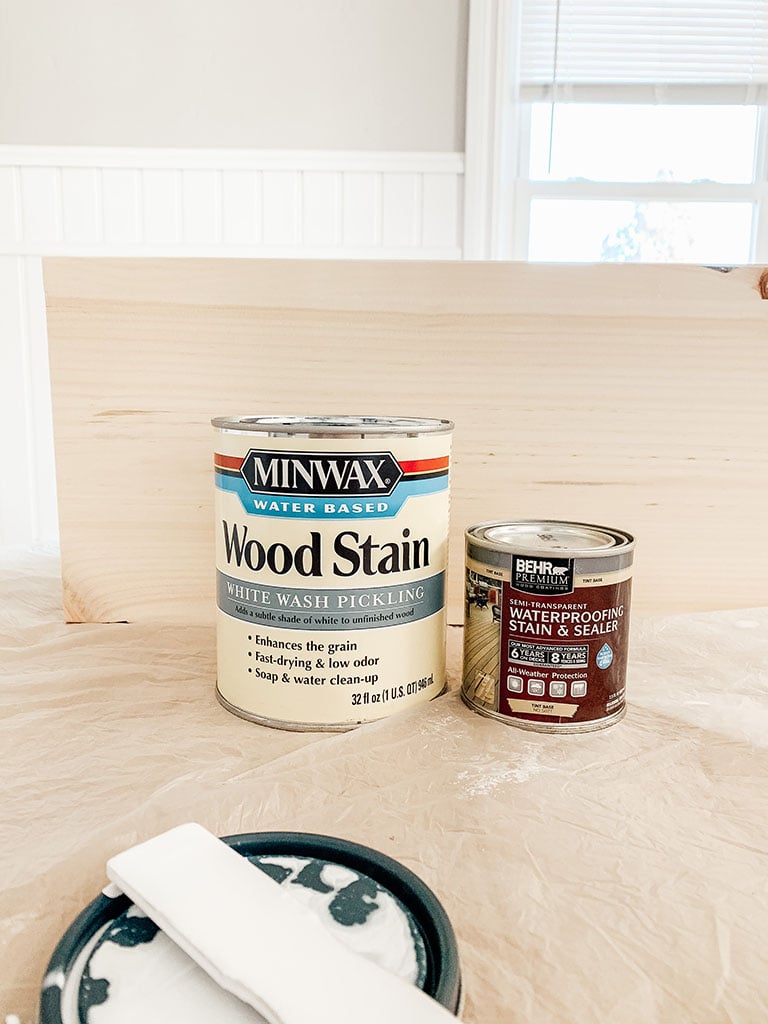
Once all your pieces are assembled, you can stain with your favorite stain. We used this Minwax White Wash Pickling paint to remove any yellow from the wood. Then we used Behr semi-transparent waterproof stain and seal tint base number 5077 in Cordovan Brown over that. To finish we used wood veneer sheets to cover the end caps. We used the same staining process we used on the boards, on the veneer sheets.


The stain for the mantel was inspired by The Blooming Nest and the idea to use the wood veneer sheet on the end caps came from Remington Avenue.
To mount the mantle, we took 4 small pieces of 2 x 4 and screwed into the fireplace studs at the approximate height we wanted the mantle. Then we screwed the mantle into place from the top into these small pieces of wood.

Step Eight: Install Electric Fireplace Insert
We went with this electric insert from Amazon. When it arrived we were pleasantly surprised with how real it looks. One of my biggest concerns was that it was going to look cheesy with a fake fire. It has a brick background and the logs look very realistic. There are three flame settings and it also has a heater with temperature control.
So far we have found the quality to be great and it also comes with a remote which is always a plus. It is very easy to install. You have already built your fireplace to the perfect opening dimensions so all you have to do is plug it in and slide it into the opening.
One thing we did not realize when we purchased is that there is no way to secure it into the wall. But we found that once it was in the opening it is a tight fit. So, for now, we do not have any concerns with it falling out and that also allows us to easily access behind it if we need to. Shop our electric insert here.
Step Nine: TV Mount & Wire Management (optional)
The final step is installing your TV if that is what you will be putting over your mantel. We chose the Mantle Mount MM540 to mount our TV over the mantle. We chose this mount because it allows you to pull the TV down over the mantel. Our TV was too high up and this allows you to watch TV without straining your neck. Follow the provided instructions to mount your TV with the provided hardware.
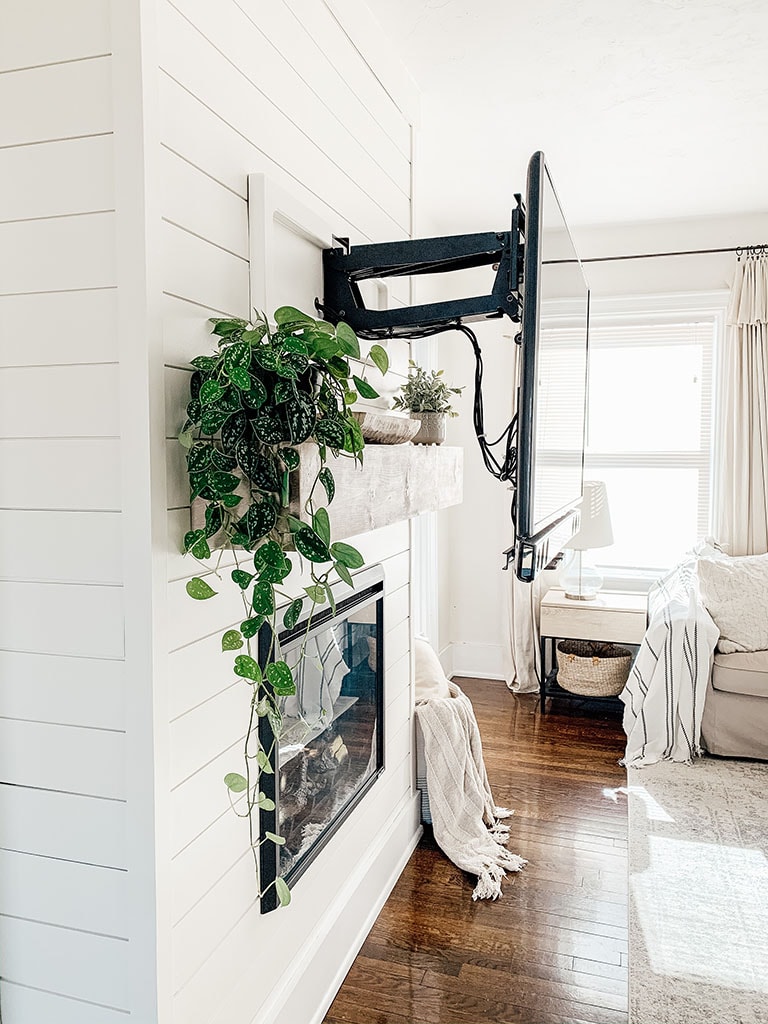
For the wires, we drilled a hole through the cover of the mantle mount and the shiplap. This allowed us to run all the necessary wires for the TV. These all linked back to our equipment located behind the secret door. We used zip ties to clean up the wires.
We are so happy with how this project came out and it was worth all the effort. I would say this is hands down my favorite DIY we have ever done. I hope that this guide inspired you to build your own shiplap fireplace. If there is something that we did not cover or if you have any questions please feel free to leave them in the comments. If you do build it let me know. You can send me an email or use the tag #mddinspired on Instagram!
What to Read Next:
Farmhouse Style Drop Cloth Curtains- 2 Ways
DIY Dining Room Table Makeover
Want to save this for later? Post this DIY Shiplap Fireplace to your favorite Pinterest Board!

Did you know you can shop all the details from my projects, my home, and my favorite affordable decor in one place? Visit my LTK shop for effortlessly stylish finds that bring designer looks to your home for less.


This turned out so well! The secret door is brilliant! Thanks for posting such a detailed description!
Love
It. I also love
Your floors! What stain did you use for floors?
We didn’t stain our floor so I don’t have the exact color but when we have done touch-ups we have used dark walnut.
I’m sure that could not have turned out any better!! I love the look and the style so much, and what a great accent for the room as well. Your tutorial is very specific which is necessary for a project like this. Thanks so much for sharing your beautiful new project!!!
This looks so helpful, we are planning on building one just like this and your instructions are going to save us so much learning time! Thank you!
Reading through this quickly I wanted to know the width of the side wall that you built. I saw all the front measurements but not the side. I know it does depend on the fireplace insert but would like to know your width.
Thanks!
Our sidewall is 12″ before shiplap and corner trim.
Technology confuses me so please excuse my ignorance. Where is your cable box and DVR? My system may be old fashioned, but I must point my remote at the cable box and need to insert DVRs. If that is the case, how would I adapt your creation?
My cable box does not require the remote to be pointed at it and the door opens enough to be able to use the DVD player easily. I have seen others place equipment next to the fireplace and hide the cords or I have seen people build a box right behind the tv.
The materials list for the mantle includes 1 2” x 4” x 8’ board but I don’t see where this is used. Is that a mistake?
This is used as the support for the mantel to attach to the fireplace. You will not need to use the entire board. (see photo for example)
You can get some heavy duty Velcro and Velcro cable box behind tv making sure the ir sensor on cable box is at very top of tv just out of sight but so remote can reach it.
I love this!! Thank you for being so specific! Do you have a sub woofer? I have no idea where that should go? Does it fit in the secret door? Besides that all we have is the DVD player which could easily fit in the side door!
I am happy to hear you found it helpful! Our sub woofer sits right behind our couch.
I love it! I got the exact fireplace can you tell me the exact width and height it is because you inserted the fireplace interested because you said it was a tight fit
We just decided to add an electric fireplace and your instructions will be so helpful! Thanks for providing so much detail. I might have missed it, but I was wondering how wide your TV is?
Thanks again!
Our TV is 48inches.
I love how this turned out! Thank you for the tutorial! I have one question, when you added your Tv did you add the flat panel and build that yourselves?
Everything involving the TV was provided and instructed by the mantel mount that we purchased.
Love this! Thanks for the detailed how-to! All in, approximately what was your total cost?
I would say approx $1300. That is with the fireplace insert and TV Mount.
Just curious, what size wood did you use for the trim at the top of the fireplace. Is that 1 by 6? Also, did you build any support to hold the body of the electric fireplace inside of the unit or did you just rely on that front frame to support it? Thanks!
We used a 1×4 for the top peice. Ours looks a little bigger because our house is slanted so we had to add extra fill. For the fireplace we did add an extra 2×4 at the bottom. You can see a good picture of that under Step Four: Install Shiplap.
Did you vent your fireplace? Or do any heat resistant drywall behind it? I saw this mentioned in some of the comments for the fireplace you listed.
It is an eclectic fireplace so we did not do any venting. How it sits in the cavity it is at least 6 inches from the back wall. You do not have to have the heat going on it for it to light up but I really don’t think it heats up enough to use heat resistant drywall.
You’re design is beautiful! I am looking to do something similar in my living room but I am torn between the classic square designed fireplace insert or a more modern rectangular insert. My TV is a 65” and I am worried that it will overwhelm a square fireplace. I’m wondering what your thoughts are since you have an eye for design?
I think with a TV that big I would go with a rectangular. The Blooming Nest uses one that I don’t think looks too modern. You can find it her here https://www.instagram.com/thebloomingnest/
How did you do outlet access for the tv? I saw your power strip but how do you access it?
The power strip is accessible through the secret door. This gives quick access to all power except for the plug for the actual fireplace insert. You have to remove the insert to access that one.
What brand/model of tv mount was used?
This information is located in the last step on the post.
I’m going with this fireplace insert. What are the measurements you used for height and width of the frame. I see the manufacturer gives a usable dimension range. You said yours fit snug, so I’d like to use the same dimensions.
Hi Mike, The manufacturer gives you the dimensions of the front of the fireplace but once you get it you will see that there is a metal box in the back. We measured the width and height of that and made our opening the same dimensions.
I’ve researched how to do this a million times. Bar none, your tutorials is the best! So clear and he,foul. Thank you for taking the time to do such a good job!
Thank you so much!!
When you say you used 5” shiplap, is that the size of the actual visible width? The shiplap I am looking at is 5 inches but the actual visible width is 4 1/2.
Yes the visible width would be less. The actual board width is 5.25 inches.
This is such a great tutorial! I am having trouble understanding the secret door though. Mainly I don’t get the “base door” vs “backboard” vs shiplap part of the door. Could you clarify, is the base door just a couple 2x4s? Then you attached the shiplap to those? Is there plywood or anything that you used?
We just created our fireplace using your inspiration, thank you! It was so helpful!
I love your plant decor, where did you find those?
Thank you
You are so welcome! All of my plants are from Home Depot.
Thanks for such an awesome tutorial. I see your sound bar in the before images, as well as directly below your TV in the after images.. how did you do that? Is the sound bar on a stand, shelf, or also has a mount?
Thanks! Great work!
The sound bar mount is apart of the mantle mount.
This tutorial is amazing and so well detailed! Really would like to do a similar design in our home. Just wondering if you think this would be doable over top of a floating laminate floor, or would flooring have to be removed first?
I’m glad you found our tutorial helpful! I would say that you can just place it right over your existing flooring. All of the anchors go directly into the wall.
Hello! What size is your tv? Love this!!
Hi there! I am wanting to do this but worried about the weight of the TV … assuming but want to confirm that you mounted the TV into the stud pieces about the fireplace insert?
Yes you will definitely want to mount into a stud and not just into the wall. We mounted our actual TV mount to the studs based on the directions they provided.
This turned out beautiful! I am duplicating this as we speak (or type!). Question: what are the dimensions on your mantel? Depth? Height?
Thank you!
Hi Kelly, all of this information is in the post 🙂 You can find them under final measurements and the materials list for the mantel.
It appears the product listings for the construction screws (Home Depot) and secret door hinge (Amazon) are showing the products as no longer available.
Could you recommend replacement or other locations to purchase these items at?
Links have been updated. Thank You for letting me know 🙂
Thank you SO much for sharing these details! I really want to do this but no one has been so specific with materials. I am still not convinced I can do this myself as I’ve never even used these tools but hopefully I can figure it out! Thanks again!
I’m so happy you found our tutorial helpful. You can definitely do it!
We followed the tutorial very closely, adjusting for our measurements. Our fireplace insert is 50 inches wide and we love the way it turned out! Thank you for such clear directions. It looks fabulous. Wish I could share a pic!
Yay!! I’m so excited that you love it. Thanks for the sweet comment.
If you planned on doing built ins would you have done anything different to the sizing? We are planning to do a brick one around the same size, and plan on using unfinished top kitchen cabinets for base of built ins on each side? Great tutorial I have been searching for months, any this is the best I’ve read, also love the Baird and battan tutorial!
Hi Catherine, I am so happy you found our tutorial helpful. Sizing is going to depend on your wall and how big your base cabinets are. I definitely would modify to fit your exact space.
Looks great! Just a quick question. When creating the frame for the fireplace to sit in, did you use the outside dimensions for the fireplace? We ordered a different one, but it gives us the outer and inner dimensions.
We used the dimensions of the metal box in the back not the outer face of the insert.
This is such a great tutorial! I am having trouble understanding the secret door though. Mainly I don’t get the “base door” vs “backboard” vs shiplap part of the door. Could you clarify, is the base door just a couple 2x4s? Then you attached the shiplap to those? Is there plywood or anything that you used?
Hi Erik! The base door can be any leftover wood you have. You just need to be able to cut to fit the opening and be able to attach all the shiplap pieces to it.
Hi,
Did you screw the framing into the floors or just into the anchors?
Thanks
This post was just what I needed to start my own project, Thank you!
I have limited space in our living room and was hoping to create some storage below the fireplace (small doors on hinges that open out and down instead of covering completely in shiplap) Do you think that would be feasible with this construction design and safe underneath the fireplace due to heat?
I definitely think that you could. The electric fireplace does not put out enough heat for it to be a concern. You also do not even have to use the heat function if you don’t want to.
This is a wonderful tutorial! I’m planning to tackle this project soon for my living space! What size is your tv btw for you to have a 5’ width. My tv is 55” so I want to make sure it’s centered.
Our TV is 48inches
Hi looking to do this in our new home. Did you screw the frames into the floor?
Thanks
Jason
We did not screw to the floor just the wall.
Love this! I was wondering if you had to move your intake vent for your heater? Looks like you may have. We also have a vent in the way and am wondering how you moved it? Thanks!
Yes we did. We hired an HVAC guy to move it for us and then my husband patched the floor.
This looks wonderful and your step by step is great! Thank you for sharing. **Also, what app/program did you use to draw your rendering of what you wanted it to look like before you started the project?
So happy it was helpful. I used a program call google sketchup.
Love this! Do you mind sharing the total cost of this project?
I would say approx $1300. That is with the fireplace insert and TV Mount.
Wow! This turned out so amazing! I would love to recreate this in my home here in Wayne, PA. I am having my hardwood floor refinished next week, and I am going to have to convince my husband this should be our next project. Thanks for sharing!
Thank You!! So happy you found it helpful.
Curious the reason for using veneer on the end caps? Couldn’t you just use that same wood planks as three long pieces?
I was wondering how you got the color of your mantle with the white wash? I have tried but can’t seem to get the technique down.
Thanks for the clear instructions. Ours turned out great.
Hi Jennifer! I am so glad you found this post helpful. I do have a section on the mantle finishes and materials. I used these to get the color you see. Sorry, I don’t have any specific techniques other than that.
Absolutely love how it turned out. We plan to do this soon! Your detailed instructions will be so helpful; thank you!
Do you mind sharing where you got your curtains/rods? I just love everything about your space!
Hi Kelli! You can find all the information about my curtains in this post: https://michealadianedesigns.com/diy-drop-cloth-curtains/
Thank you for these plans. Was thinking of tackling it this weekend. We have a very large wall in our living room. I was thinking of making it 10′ wide but I’m guessing that since the shiplap is 8′ long, that it would take 2 boards for every 1 in your directions, adding another roughly $200. If I go wider, anything else I should be aware of aside from resizing my holes and boards? Thanks!
I am happy you found the plans helpful! Going that big you will also need more support in the frame. Make sure you account for that in the amount of wood you buy.
Hi Micheala! I love this and am planning on following your plans for this fireplace build out in the next week or so! I’m sorry if you answered this already but does the framing go all the way to the ceiling? My ceilings are 9’ and am wondering if I should purchase 10’ boards for the frame instead of 8’. Thanks so much!
Hi! Yes, you will definitely want to get 10ft and cut to size.
The inside corner trim and lattice trim you linked to in the article are 8ft long. Have you already discussed with anyone what you would do if you have 9ft ceilings? Would you add a separate and extra foot of trim or would you look elsewhere for 9ft+ long pieces?
I’m not much of a caulker/painter, but I’m assuming that adding two pieces of trim for one corner might look bad if not executed more perfectly than I am capable.
Any thoughts on best approach?
Hi Daniel, 8ft worked for us but if you have higher ceilings I would get a longer piece of trim. I know they sell trim that size by the foot.
This turned out absolutely BEAUTIFUL! Can you please tell me what size fireplace insert you ordered?
Thank you! 🙂
Shelley
I ordered the 30″ one. I don’t believe they make that size anymore so I would go with the 33″
Good afternoon.
Would you mind sharing the dept of the fireplace ? I world love to do this for our new house
Ours is 12 inches before finish materials and trim. You want to make sure you make your’s deep enough to fit the eletric fireplace that you choose.
I love this tutorial! Thanks so much for sharing. I am making a plan to make the mantle just like yours. I love the color that you used, so I am planning to purchase the same colors. I found the Behr stain in Cordovan Brown, and it looks very dark, almost black. I just want to make sure I am purchasing the correct stain. If so, is there a trick when staining to not make it so dark?
Thanks in advance!
Hi Ashley! The stain does look dark, but on top of the white pickling it lightens it up. When staining you want to put a small amount on a cloth so it should go in light and you can layer to get the desired color. I would test it out on a sample piece first.
Beautiful fireplace. I’m in the process of doing something similar m. I bought the same insert that you guys used. I was wondering if you remember the height from the floor to the bottom of the fireplace you guys used when you framed it?
Hi Alex, I don’t remember the exact dimension but our goal was to center the insert between the floor and the bottom of the mantel.
Thank you so much for posting and sharing this beautiful fireplace and mantle. I love your style!
We have done all your steps and now are attempting the secret door. Would you be able to send me a picture or the frame inside door? I’m having such an issue visualizing this and I really want to replicate the door.
Thank you so much! God bless!
Turned out good. Very easy to follow !