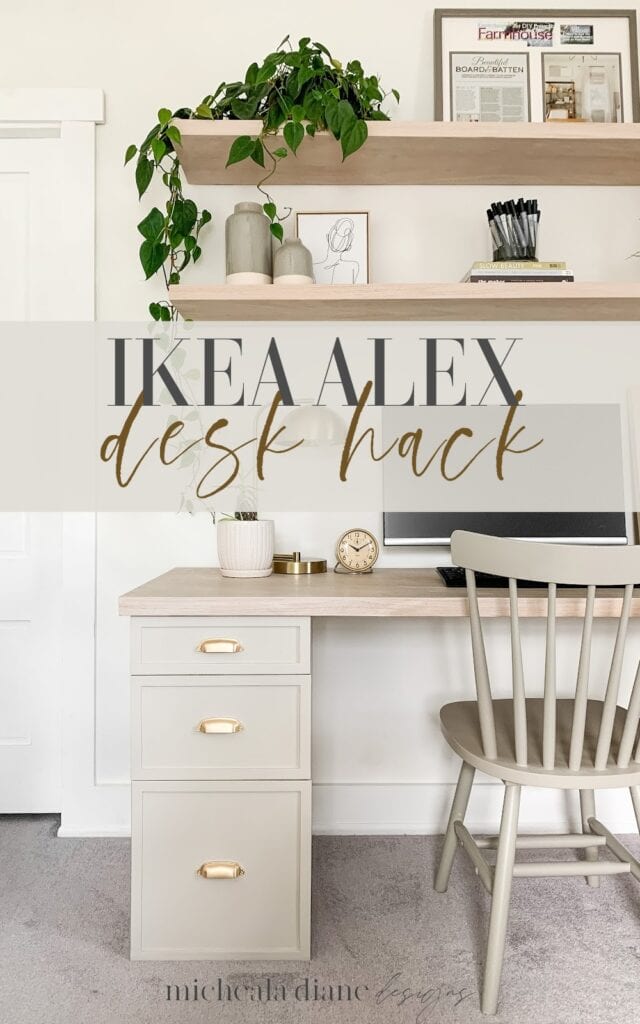
Ikea Alex Desk Hack
In this post, I am sharing an easy step-by-step tutorial on how to DIY a desktop and pair that with a beautifully upgraded Ikea Alex hack.
To get this exact look, be sure to use this Ikea drawer
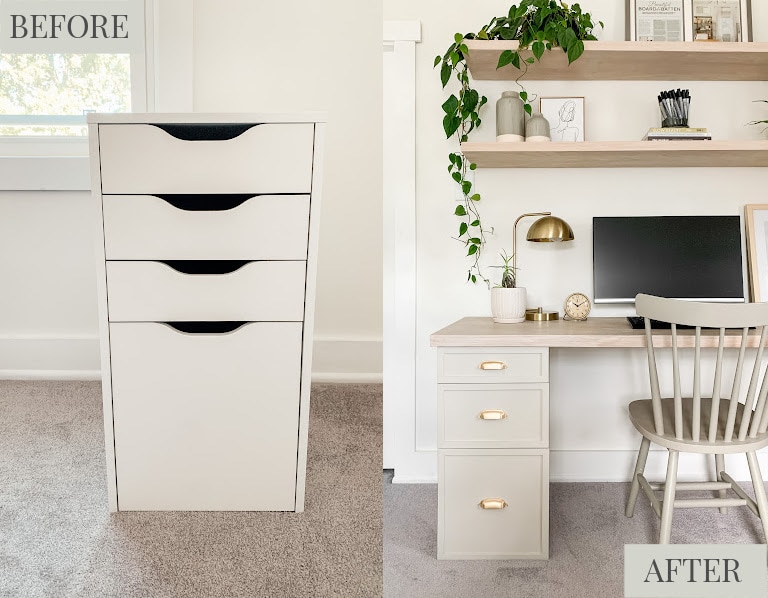
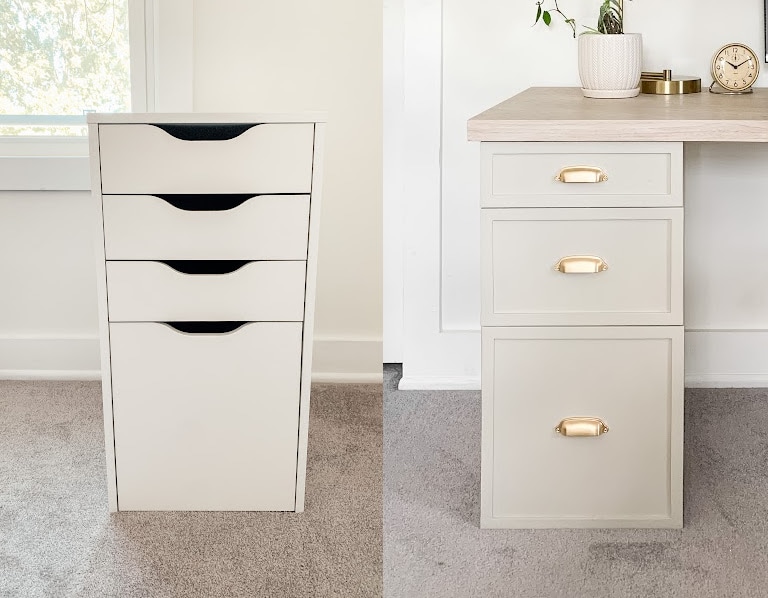
Ikea Alex Hack Before & After
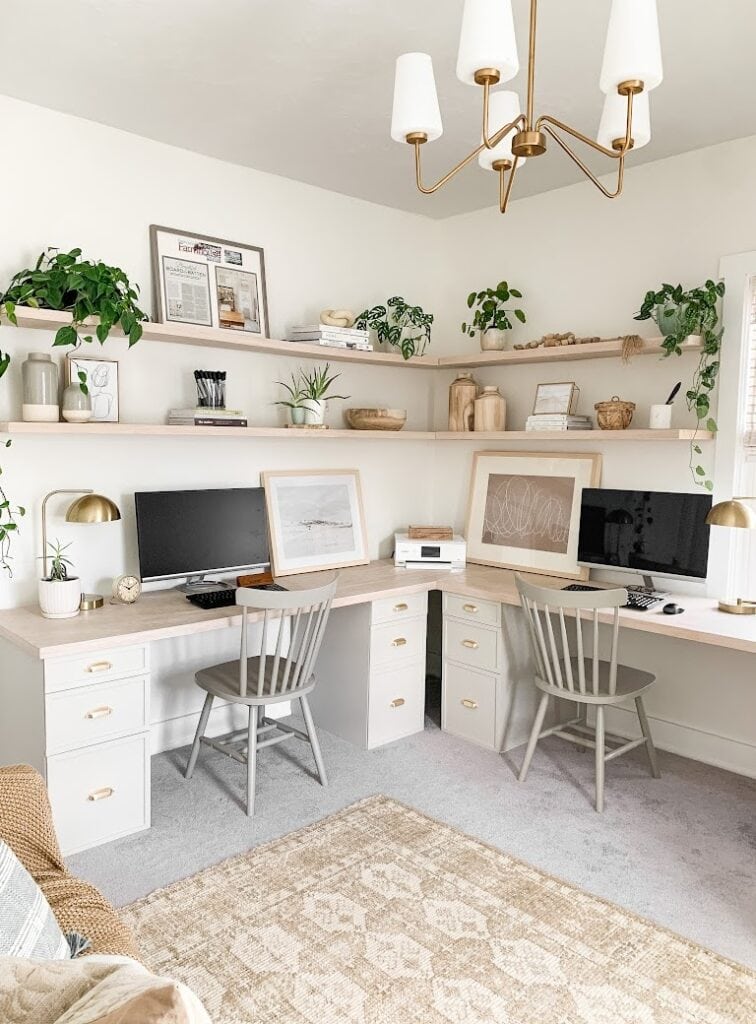
In this post, I will share how to transform the basic Ikea Alex drawers into a high-end L-shaped desk at a fraction of the cost of a custom-built-in desk.
This project is split into two parts: the DIY desktop and the Ikea Alex drawer hack. We constructed the desktop from oak plywood, oak veneer, and stain. Then we modified the desk drawers using the Ikea Alex drawers and a simple custom trim detail.
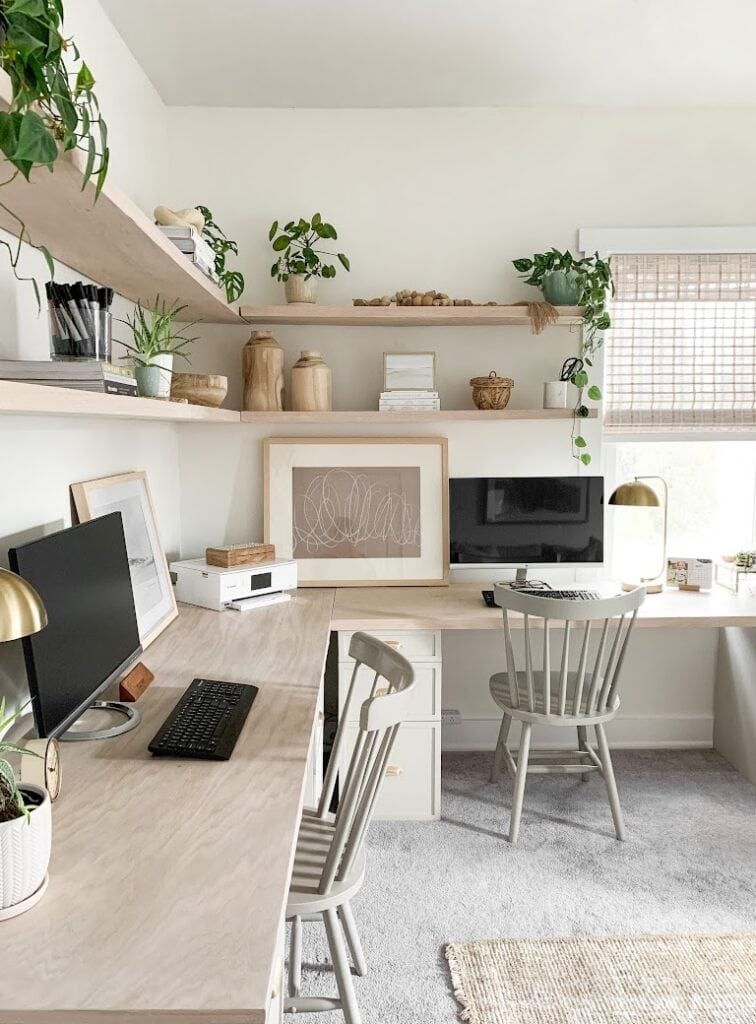
We created a corner desk unit with two desktops and four sets of drawers. This project can easily be duplicated for a single desk with two sets of drawers.
Design Details
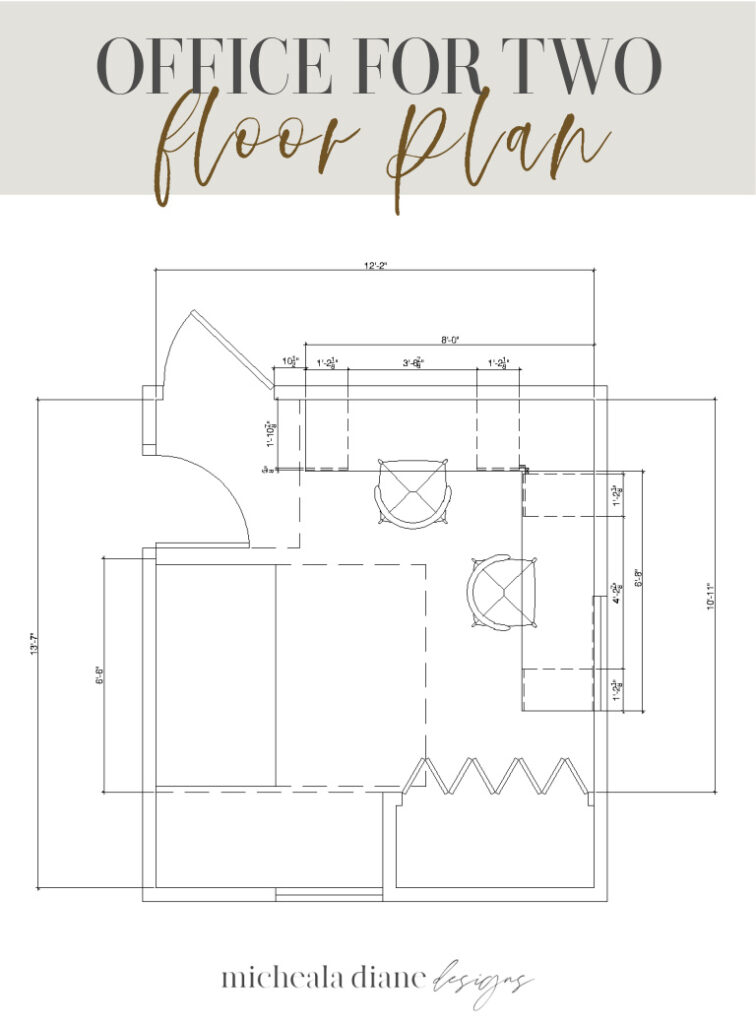
With any design project, I always recommend starting out with a detailed plan. This will help you solve any design issues that come up before you get started.
It also helps you determine the quantity of material that you need to purchase. A detailed plan will help you eliminate any waste and ensure you have enough materials.
Below is the floor plan I created for this space. This determined the overall size of the desktop and placement of the Ikea Alex drawers.
Related: You can check out the completed space and all the product links in this post: Home Office Guest Room Design
Amazon Finds for this Tutorial
Get all the Amazon-sourced supplies for this tutorial here.
CLICK HERE TO SHOP
Everything You Need for This IKEA Alex Desk Hack
“Affiliate links provided for your convenience, please read my disclosure for more information.”
You can purchase the Ikea Alex Drawers HERE or at your local Ikea store.
Below are the quantities we used for our project. These may need to be adjusted for your specific space.
DIY Desktop
4’ x 8’ Red Oak Plywood ( Qty. 2) ( Home Depot)
Red Oak Veneer ( Qty. 1 Roll)
Simply White MinWax Stain (Qty. 2, 1/2 Pints)
Polyurethane Matte (Qty. 1)
Sand Paper
Ikea Alex Drawer Hack
Ikea Alex Cabinet (Qty. 4)
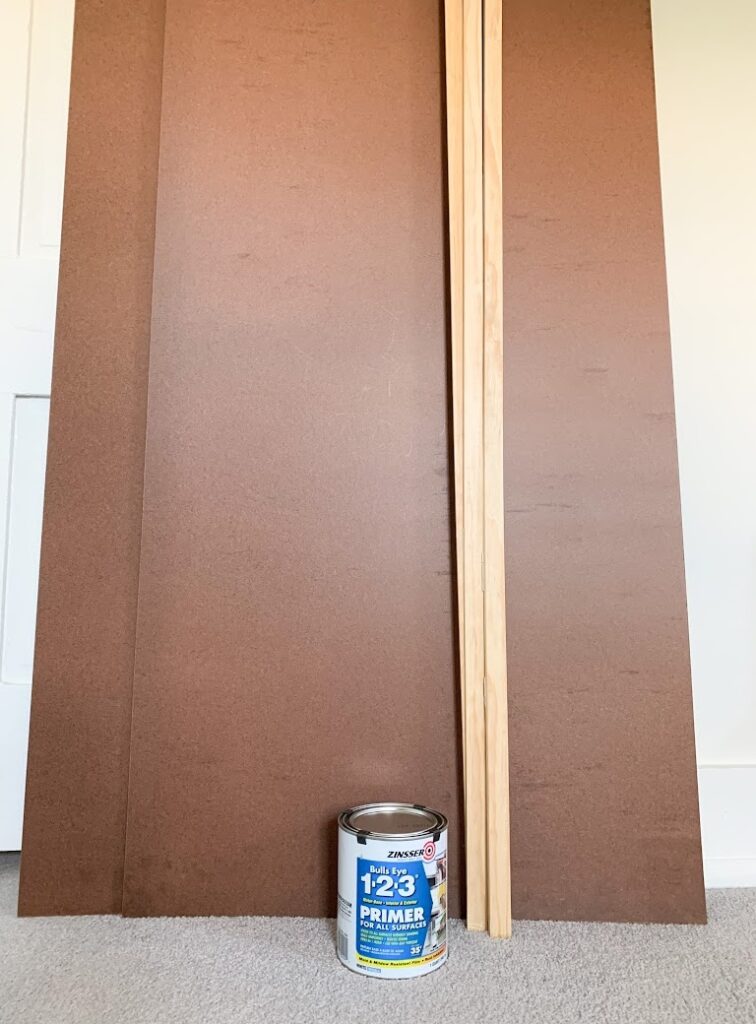
4’ x 8’ Hardboard (Qty. 1) ( Home Depot)
Drawer Trim (Qty. 46’) ( Home Depot)
Wood Filler
Paint Roller ( Home Depot)
Primer Paint ( Home Depot)
Benjamin Moore Revere Pewter Paint
Tools Required:
Household Iron
DIY Desktop Tutorial
Standard desk depth is between 30-18 inches. The most comfortable depth in my opinion is 24 inches and that is what we decided to use for this project. Making a 4-foot x 8-foot Red Oak Plywood the perfect size for a DIY desktop.
Step One: Cutting the Plywood
Once you have all your materials, the first step is to cut your plywood to width and length. These desks are 24 inches deep and 1.5 inches thick. This means you will be cutting the 4-foot boards right down the middle lengthwise and then gluing them together.
Taking your circular saw and Kreg Guide, set the guide to 24 inches. Mark 24 inches with a Chalk Line to ensure you are cutting your boards in a straight line. When everything is in place, carefully rip your boards in half. Alternatively, if you have a Table Saw, you can feed your board through that at 24 inches.
Safety Tip: Plywood boards are ¾ inch thick, 8 feet long, and made of oak. They are going to be heavy and awkward to handle. If you can, get a second set of hands to help with moving the boards around and cutting them.
Next, you will need to decide if you need to remove any length from the 8’ pieces based on the dimensions of the room. Because the boards are glued together, if you have to cut one board to a specific length, you will be cutting two. Keep this in mind as you plan out the boards before cutting to length.

Image Source Home Depot
Step Two: Gluing the Plywood Boards
Once all your boards are cut to the proper width and length, it’s time to glue them together. This is going to create your 1.5-inch thick wood desk.
Using wood glue, cover the entire surface of the plywood board and sandwich the other “half” on top. We used short wood screws and clamps to secure the boards while they dried. Be sure to use the nails on what will be the bottom of the desk and make sure they are short enough that they do not come thru the top of the desk.
When the boards are dried and glued together, you will want to sand the edges to be completely flush. This is important for the next step. If the boards are not completely flush, the veneer will not adhere to the edge properly.

Step Three: Applying the Veneer Edges
Savings Tip: You do not need to apply veneer edges to the sides that will be facing the wall.
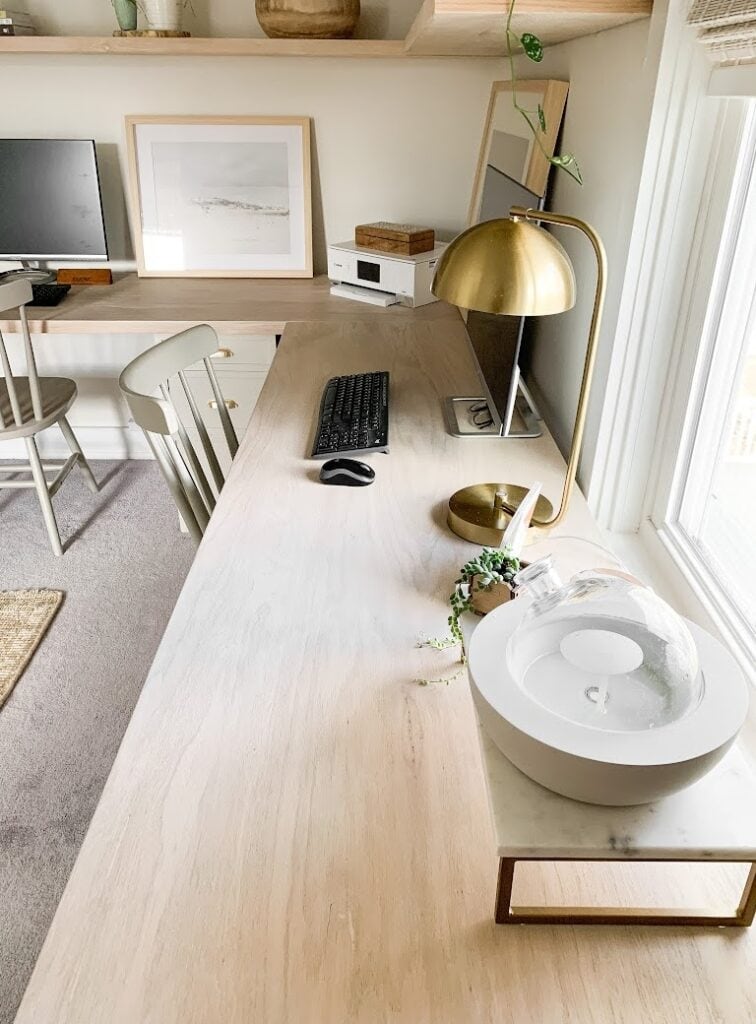
The next step is applying the veneer to the edges of your desktop. For this project, we used a red oak veneer with a 1.5-inch thickness. This matches the same wood type as the plywood boards and is the exact thickness of our desktop.
It is very simple to apply the veneer edge, and the end result looks like a solid wood desktop. The veneer has heat-activated glue on the back. Simply use the veneer and a household iron on the lowest setting to attach the veneer.
Leave a slight overhang on the edge as shown in the picture. When the strip is attached, let it cool for about 10 minutes. Then go over any stubborn spots that didn’t get glued all the way. After the strip is attached, sand the edge flush. You should end up with a sharp edge.
Follow the steps above for all the sides that will be exposed when the desktop is installed.

Step Four: Stain DIY Desktop
For the stain, we chose the stain Simply White by MinWax. You can choose any stain color that you would like for this project.
Simply White has a beautiful pickled white-washed look that gives us the light wood finish we were looking for. When choosing a stain, be mindful of the type of wood you are staining. The same color stain will look different on each wood type. We selected ours based on what it looked like on Red Oak.
Before applying the stain, we used a wood conditioner following the directions on the can. This allowed us to get an even coat of stain and prevented any streaking.
Next, we applied our stain liberally with a rag, wiping off the excess. Finally, we finished with two coats of matte polyurethane to protect the finish. We couldn’t be happier with the result.

Ikea Alex Hack Tutorial
A budget-friendly way to get a custom drawer look is to use an existing inexpensive furniture piece and modify it. We took the basic Ikea Alex drawers and did just that.
We added simple trim pieces to existing Ikea drawers, and we were able to upscale the look at a fraction of the cost of more expensive custom cabinetry. This section shows you exactly how we did it. To get your own custom look, you can use any paint color or hardware.
To get this exact look, be sure to use this Ikea drawer
You will first want to assemble the Ikea Drawers per the given instructions before moving on to the next step.
What is standard desk height?
Standard desk height is between 29-30 inches. The Ikea Alex drawers paired with the 1.5-inch desktop tutorial above will give you a 29-inch high desk.
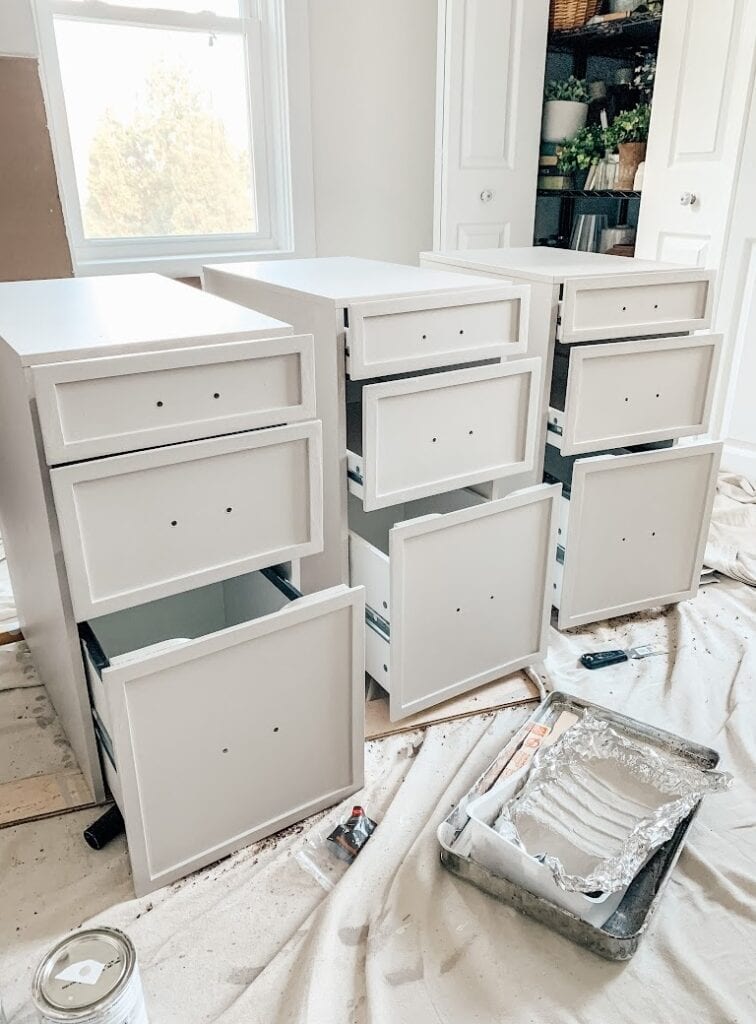
Step One: Cut the Hardboard and Trim
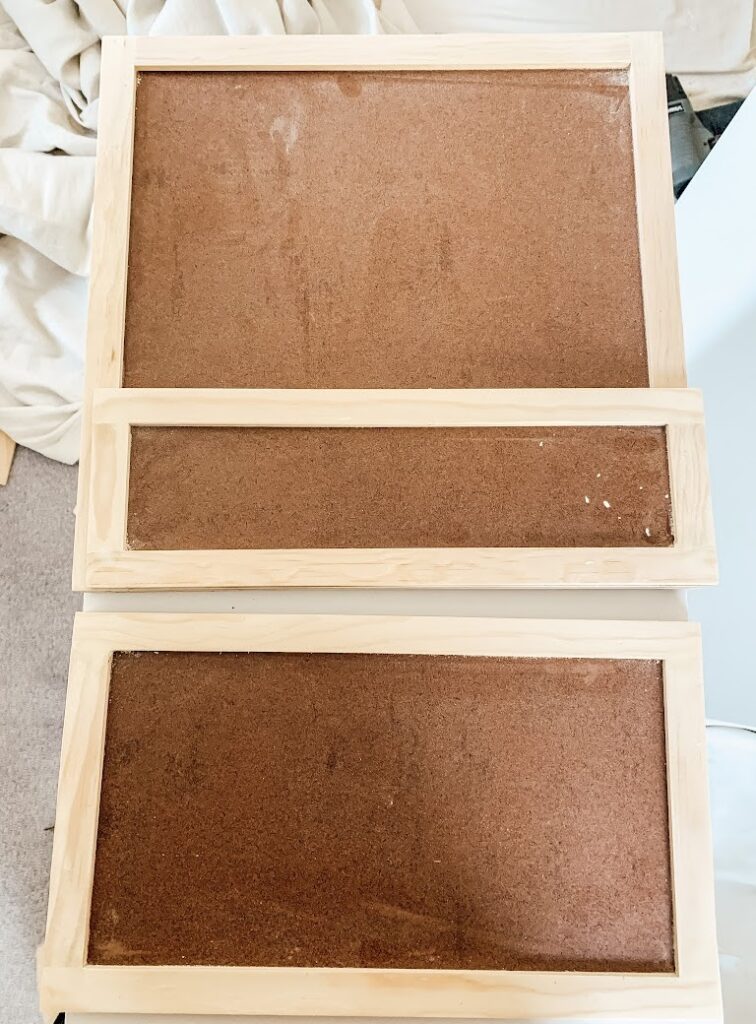
The first thing we did was remove one of the drawers. The Ikea Alex drawers we chose come with four standard drawers. We removed the second one from the top and made panels for only three drawers. This gives you three ascending drawers in increasing width and is more visually pleasing.
We decided to create our drawer front using Hardboard and a 1/4-inch x 7/8-inch Pine Lattice Molding. This thin-style drawer front allowed for a slight overhang on our desktop. And for our hardware to fit proportionally on the smallest drawer.
Next, we measured the width of the Ikea drawers and cut the hardboard accordingly. Below are the dimensions we used for the hardboard cuts. These cuts can be made with the use of a Kreg saw guide.
Top Panel: 4-5/8 inch tall x 14-1/4 inch wide
Middle Panel: 8-1/4 inch tall x 14-1/4 inch wide
Bottom Panel: 14-7/16 inch tall x 14-1/4 inch wide
After the hardboard pieces were cut we moved on to the trim detail. All trim pieces were cut to make a border around the hardboard using a miter saw.
Step Two: Assembling the Trim
Next, we glued the trim pieces to the hardboard using wood glue and let them set.
To do this we used old paint cans, boards, and weights to keep the trim pieces flat against the hardboard while the glue dried. We also used a small amount of wood filler in the joints.
Once the glue and wood filler was dry, we lightly sanded the pieces to be completely flush and to hide the trim joints.
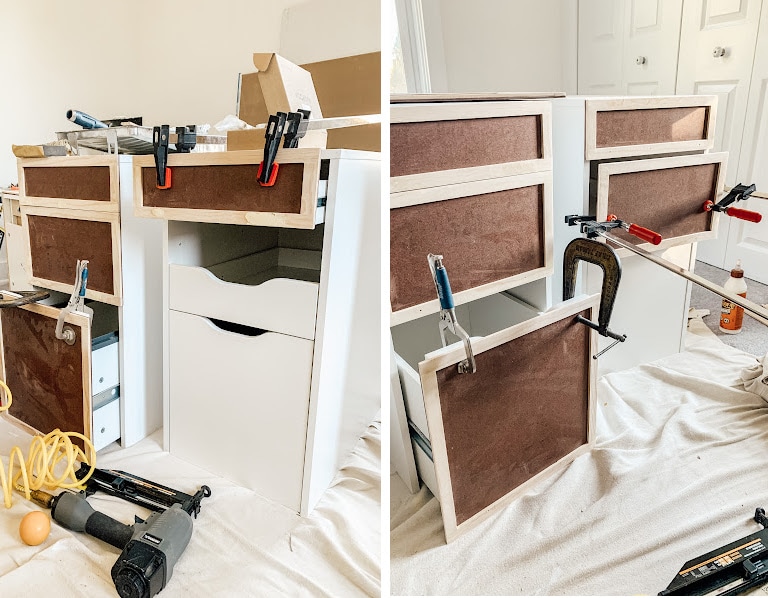
Step Three: Attaching the New Drawer Fronts
The next step is the most challenging part and requires a little bit of practice and patience.
To attach the newly created drawer front to the Ikea Alex drawer fronts, we used a combination of wood glue and finish nails.
The first step is to apply a generous amount of wood glue to the face of the Ikea Alex drawer. Place the new drawer front on top and clamp it in place. For extra support, add a finish nail, making sure it goes through the Ikea Alex drawer front to avoid nails sticking out.
Use wood filler on the nail holes and sand flush. Repeat this process for each drawer. The more clamps you have, the faster this step can go.
Step Four: Sand and Paint
The next part of the process is the final sand and paint, but before we do that, it is a good idea to figure out what drill holes you need for your hardware.
We decided to center each drawer pull and drilled the two holes required for the gold cup pulls we selected.
After the hardware holes were drilled, we moved on to the final sand. It is important to make sure that each drawer can open with ease. This requires a bit of sanding on the top and bottom of each trim piece to make sure there is clearance between all drawers.
We also gave the sides of the Ikea Alex drawers that received paint a light sand before priming. This allows the primer to better stick to the cabinet.
Once all drawers are open smoothly and you have roughed up the sides, you are ready to paint. We started with a primer on all the drawers before the final paint color. This ensures that the final paint color goes on easily and does not require a lot of coats.
For the final paint color, we went with Benjamin Moore Revere Pewter. For both the primer and final paint, we used a roller designed for smooth finishes to get the best possible finish.
get our exact drawer pulls here

Final Desk Assembly
Now that we have our DIY desktop and newly refinished Ikea Alex hack drawers, it is time to put them together.
The first step is to place the Ikea Alex drawers in the exact location they will live. When we designed our layout, we kept in mind the spacing for desk chairs and what we wanted for an overhang on the actual desktop.
For the DIY desktop, we used the Kreg Pocket Jig to create pocket holes on the underside of one desk to be used for joining the two desktops together. These desktops are very heavy. I would recommend getting a second set of hands for installation, depending on the size that you chose. If you only made one desktop, ignore this step
The final step is to place the newly constructed desktops on top of the drawers. We decided on a 1-inch overhang on all sides of the desktop over the drawers, except on the wall side.
Once your desktops are in place, screw the two desks together. You may also have to use shims to level the desktop as well.
I hope you found this Ikea Alex desk Hack helpful. If you have any questions, please leave them in the comments, and we would be happy to help.
You can check out the completed space and all the product links in this post: Home Office Guest Room Design
Check Out My Shop
Did you know you can shop all the details from my projects, my home, and my favorite affordable decor in one place? Visit my LTK shop for effortlessly stylish finds that bring designer looks to your home for less.
What to Read Next:
DIY Shiplap Electric Fireplace & Mantel
Want to save this for later? Post this Ikea Alex Desk Hack to your favorite Pinterest Board!


Micheala,
What a great job in your offices. Great work.
Keep up the great work.
Joanie
Love your design so much! Would you mind telling me what the depth measurement is of the trim you used? I’m currently about to start my upcycle of my Alex drawers and trying to figure out the best sizing for the trim! Thanks! 🙂
The depth is .25 inches. I have the link in the post.
Very interested in doing this in our home office space, but I have a measurement question.
I see your drawers in the picture appear to be flush with the wall in the back. If the depth of the desktop is 24″ and the depth of the Alex drawers are 14 1/2″, and the overhang is 1″, doesn’t that leave about 8″ in the back where the drawer doesn’t meet the wall? Help…
Hi Chris! The depth of the Alex cabinet is 22 7/8″. I believe Amazon has the dimensions listed incorrectly. Here is the Ikea Link: https://www.ikea.com/us/en/p/alex-drawer-unit-drop-file-storage-white-50508176/
Hi!
We’ve started this project for our home office (thank you for so much detail btw). One quick question. How long did you leave the plywood pieces clamped together before moving on? We’re doing two sections but only have enough clamps to do one at a time. Thanks!
Hi Jessica, We left the clamps for 24hrs, this is the part of the process that took the longest because we did not have a lot of clamps either.
Is there a reason why you didn’t put the drawers (in the corner) touching together without having the empty space in between? Just trying to think of how I’d clean that area 🙈
If you have the drawers touching you will not be able to open them. We plan on adding a trim piece to the corner.
Hello! Just curious what the 4 inch wood screws are for? We have small ones to help hold the boards together while they are drying but not sure when to use the ones you suggested.
Also, for your veneer did you use a 1.5 inch or 2 inch? In your Amazon link it shows 1.5 but you talked about an Overhang so just checking. Thanks so much!!!
Hi Jamie, The 4inch screws were an error removing now. We used them for our open shelving checkout this post: https://michealadianedesigns.com/diy-thin-floating-shelves/
We went with the 1.5inch the overhang suggestion is only on the ends.
Do you have a link for those gold desk lamps?
It is from Target but I don’t think they make it anymore.
Love this tutorial – thank you for sharing! How did you attach the desk top to the drawers??
We just laid the desktop right on top. It’s quite heavy so we didn’t feel the need to attach it.
Love this, and I’m planning to do the same thing! I know the top part of the IKEA unit overhangs the sides just slightly so there’s a little lip…how did you account for this when adding on your door fronts? Does that little lip make so the top drawer can’t close all the way? Because the door front will hit the proud top part before it hits the sides? How did you ensure the doors would all flush when closed?
The doors close flush using our tutorial. There is no lip at the top that I can recall and if there is it is so minimal it didn’t effect anything.
Hey! Love these and going to do them for my office. I also love the floating shelves that match! Do you have a diy on those too?
Here is the link for the shelves: https://michealadianedesigns.com/diy-thin-floating-shelves/
Love the design! How did you cut the hardboard using a kreg jig? I thought that was for drilling holes.
A jigs are tools that hold cutting tools or guides in place. A pocket hole jig makes holes. This is referring to a saw guide/ cutting jig. I have updated the post for clarity.
do you have any advice on how to use the krig rip jig on hardboard? I find it’s so thin there’s a lot of bounce against the sled :/
Love this whole tutorial. Room question – what color did you use on the walls? Thanks!
Benjamin Moore White Dove. You can see the full reveal here: https://michealadianedesigns.com/office-guest-room/
Beautiful job! I am so greatful I came across your blog and found this. I have been driving myself nuts wanting to do an Alex DIY set up but haven’t found anything feasible or that I love until this. Thank you SO MUCH! Do you mind sharing the color you used for the drawers?
Revere Pewter By Benjamin Moore
Did you paint just the drawer fronts or the whole cabinet?
I painted the sides as well but not the back. if you are going to see the sides I would paint them if not don’t worry about it.
Do you remember where you got the chandelier in the picture? If so, do you have a link for it?
Here is the link: https://rstyle.me/+McabG57KqeeP9NMk0LF1zQ
Fabulous tutorial, this is exactly how I want to lay my study out to accommodate my husband and myself. Did you end up doing a trim in between the two Alex drawers supporting the corner area?
Thank you! I never added the trim piece. Maybe one day but it doesn’t bother me.